
Crochet Mini Stocking Ornament
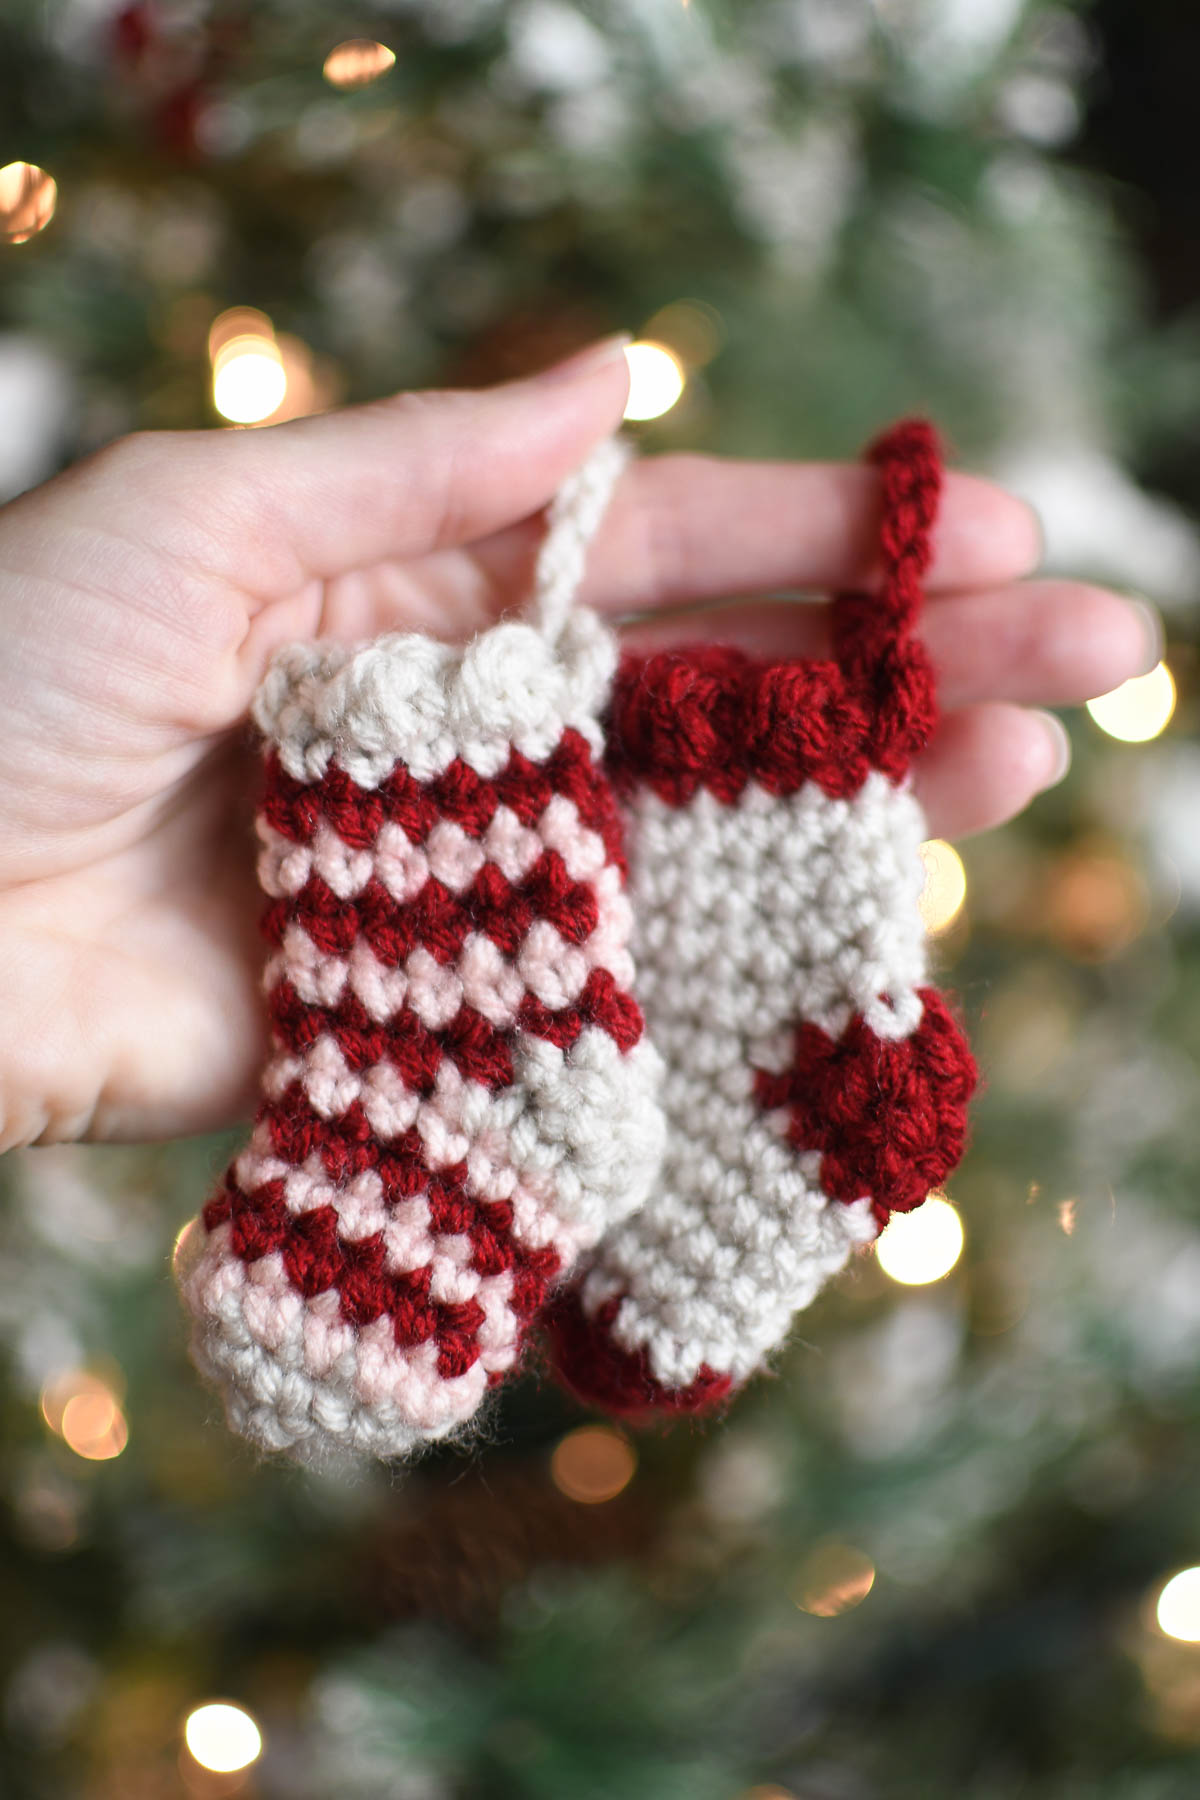
It’s that time of year again, maker friends! I’ve got a great stash buster pattern for you, just in time for holiday crafting. Grab your scrap yarn and hook, turn on your favorite Christmas playlist, and let’s get to work on these adorable crochet mini stockings. I’ve made a step-by-step tutorial that makes this an easy pattern, even for beginners!
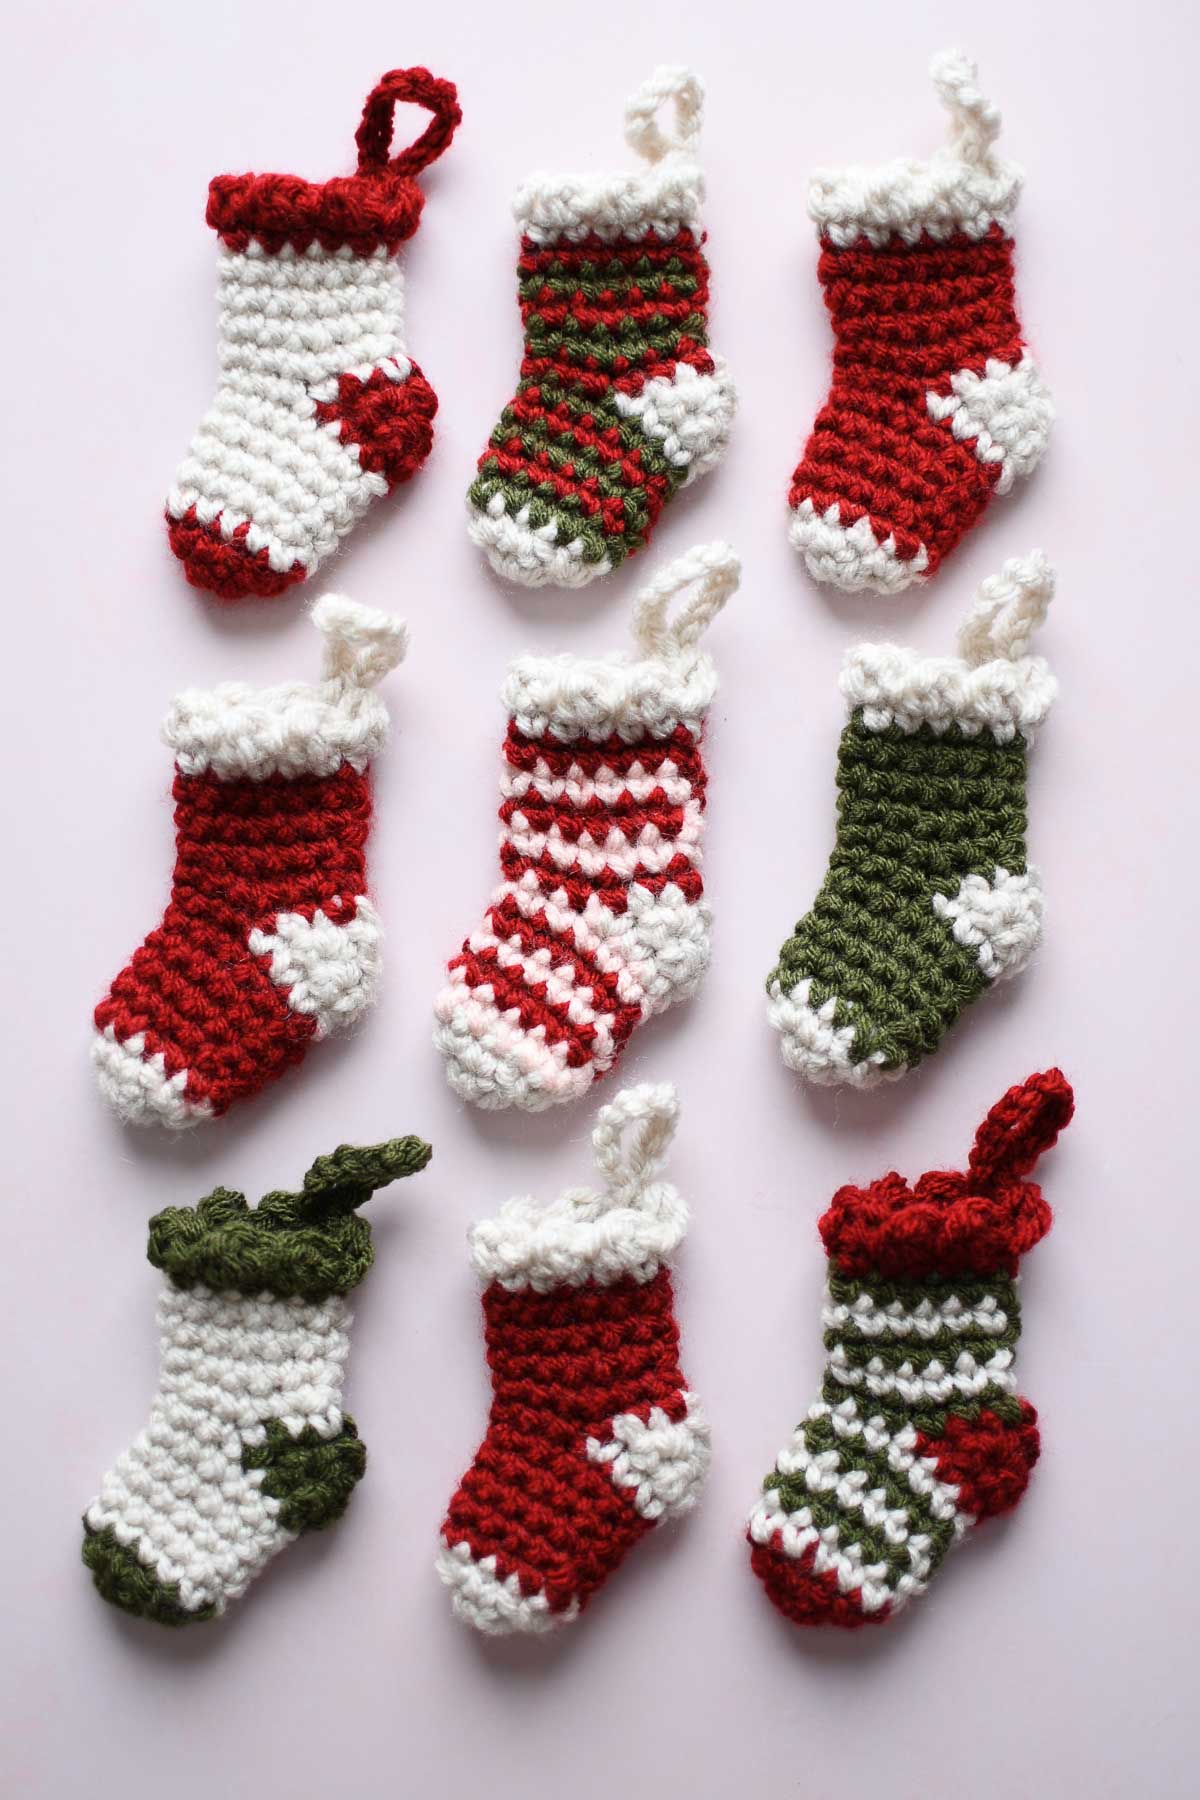
These mini stockings are tiny, around 3 inches tall! Perfect for one mini candy cane, or hang them as ornaments for your tree, put them on a keychain, or use them as a gift topper. So many possibilities with these fun stockings! And if you’re looking for more seasonal patterns, try my Crochet Christmas Ornaments next!
About this pattern
One of my pet peeves with crocheting in spiral rounds is the jagged join where you begin a new color. A lot of stocking patterns have a “front side” that is pretty and the back has seams and joins that make it look not as pleasant. I set out to make a stocking that looks great on both sides without obvious color changes. With just a few tricks, these stockings look seamless-pretty on both sides with no front or back!
Skills needed: To make these stockings, you’ll need to know how to make a magic ring, crochet in the round in a continuous spiral, attach new yarn with a standing SC stitch, increase and decrease, and working back and forth in rows.
Construction: The stocking is made in 5 easy sections: the toe, foot, heel, leg, and cuff. Each section is only a few rows, for a total of 14 rows! Once you get the hang of it, you can make a stocking in about 20-25 minutes. I find that after you’ve made a few, the pattern is easy to memorize and you can bust out several of these while having a Christmas movie marathon!
Let’s begin!
Getting Started
Supplies
- Hook: 4.0 mm
- Yarns: #4 Worsted weight in reds, greens, and whites. All yarns in this project are from Hobby Lobby
- Heel, Toe, Cuff: Linen-I love this yarn
- Stocking: Cranberry-I love this yarn
- Tools: Stitch markers, row counter, scissors & tapestry needle
Stitches & Abbreviations (US terms)
SC-single crochet
Ch-chain
Inc-increase by making 2 single crochets in one stitch.
Inv Dec-Invisible decrease by inserting your hook into the front loop of the next 2 stitches, yarn over and pull up a loop. Yarn over and pull through both loops. 1 stitch decreased.
DC-double crochet
Sl st-slip stitch
BoR-beginning of round
Standing SC-Put a slip knot on the hook and insert into the indicated stitch, yarn over and pull up a loop, yarn over and pull through both loops.
Finished size: 3.25″ by 1.5″ or 8 cm
Written only pattern:
*Using contrast color for toe*
Round 1: In a magic ring, Ch1, and SC 6. Pull tail to tighten ring.
Round 2: Inc in each stitch (12 stitches), then Sl st in 2nd st and fasten off.
*Switch to main color for foot*
Round 3: Place a slip knot on the hook and attach yarn with a standing SC in the last SC completed (12th stitch, right before the Sl st). SC in every stitch around (12 stitches).
Round 4-6: Working in a spiral, SC in every stitch around. Mark the beginning of each round with a stitch marker.
Round 7, Heel set up stitches: SC in next 4 stitches. Pull the working yarn up into a long loop. In the following stitch, place the stitch marker. We’ll continue here after making the heel.
Make the Heel:
*Using contrast color for heel*
Row 1: Starting with the last SC before the stitch marker, count back 6 stitches and attach heel yarn with a standing SC. SC in next 5 stitches (6 total), Ch 1, turn.
Row 2: SC across, Ch 1, turn.
Row 3: SC in 2 stitches, Inv dec, SC in 2 stitches. (5 stitches), then fasten off leaving a tail long enough to whip stitch sides together, then pull tail through to the inside of the work. Weave in ends.
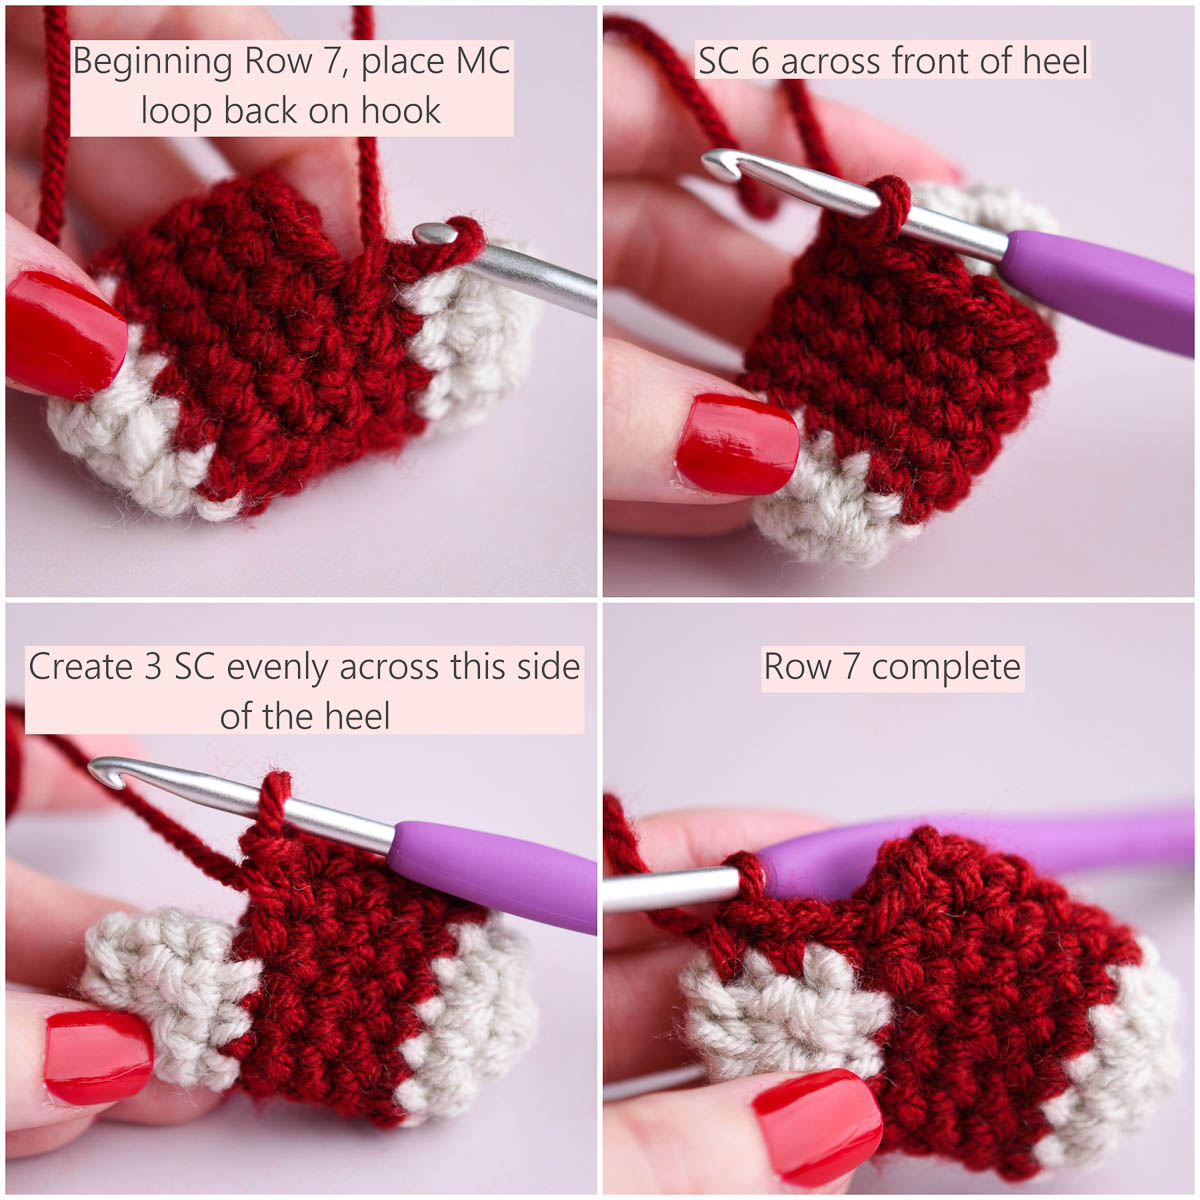
Round 7 continued: Picking up with the main color yarn and the long stitch you left before, SC 6 across the front of the work, then place 3 SC evenly across one side of the heel. The next stitch will be our new BoR. You should be at the center back of the stocking.
Round 8: Place 3 SC evenly across the other side of the heel (mark the first stitch with stitch marker), then SC around.
Round 9-11: SC in each stitch around.
Round 12: SC around to stitch marker, then SL st in next stitch and fasten off.
*Switch to contrast yarn for cuff*
Round 13: Attach yarn with Standing SC in 1st stitch to the left of the center (back) of the stocking. SC around, then Sl st to the top of the first stitch. Ch 1, turn.
Round 14: *Sl st in first stitch, DC in next* around, ending with a DC in last stitch. Sl st to the first Sl st of the round. Ch 12, then Sl st back to beginning. Fasten off. Weave in ends.
Step by Step Photo Tutorial:
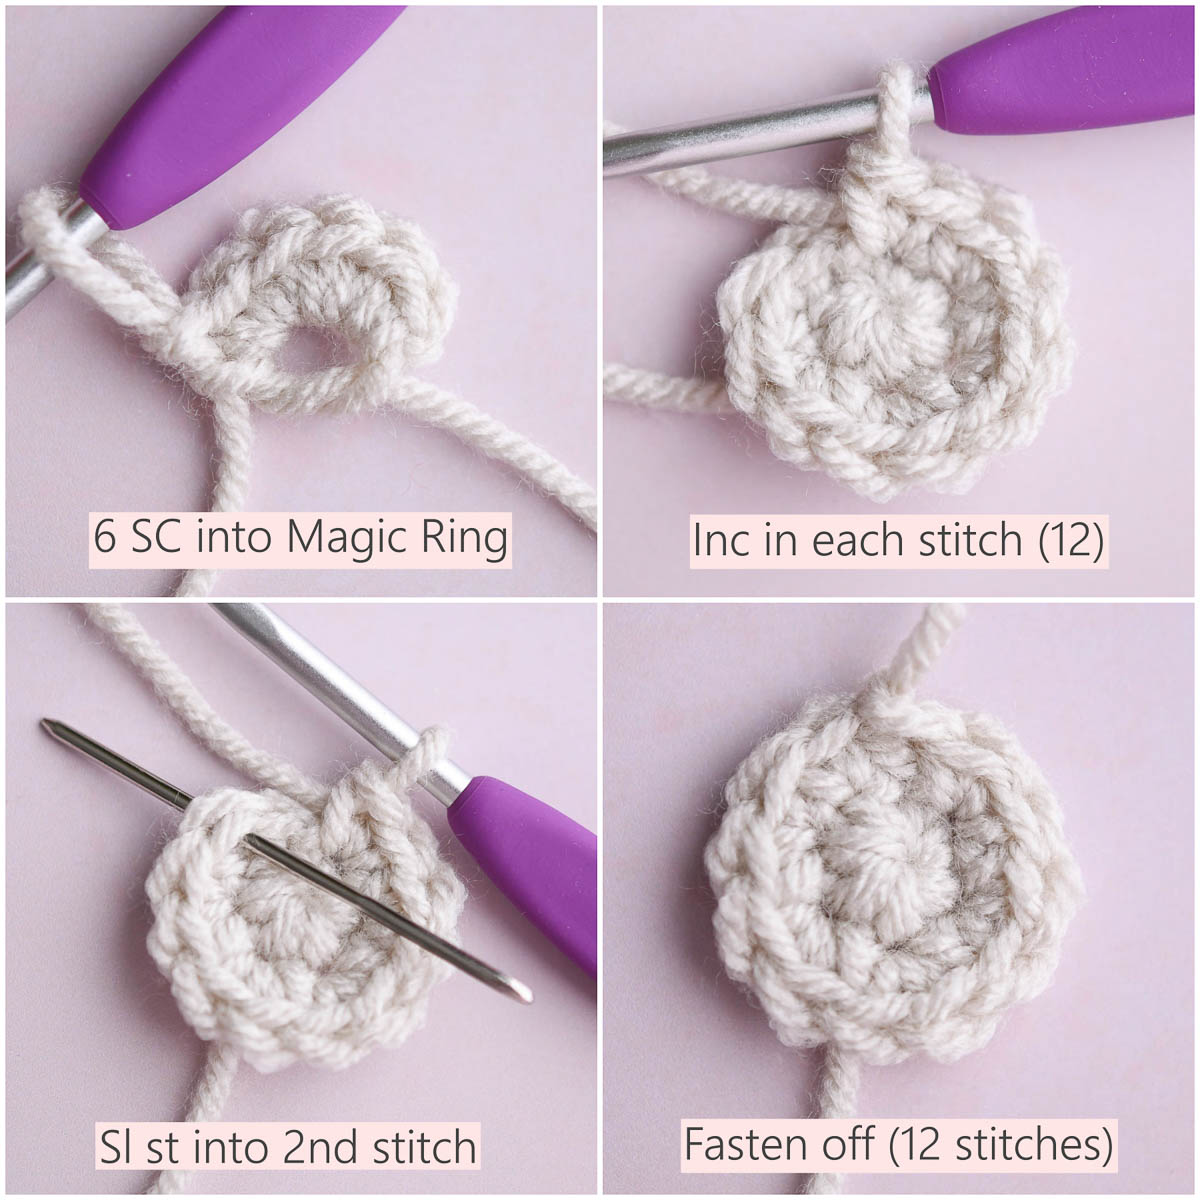
Toe:
Using 4 mm hook and contrast color (the color for the toe, heel, and cuff)
Round 1: In a magic ring, Ch1, and SC 6. Pull tail to tighten ring.
Round 2: Inc in each stitch (12 stitches), then Sl st in 2nd st and fasten off.
Foot:
Switch to main color (body of the stocking)
Round 3: Place a slip knot on the hook and attach yarn with a standing SC in the last SC completed (12th stitch, right before the Sl st). SC in every stitch around, including the slip stitch and space on the other side of the fasten off knot (work around the knot, pulling it to the inside of the work). (12 stitches).
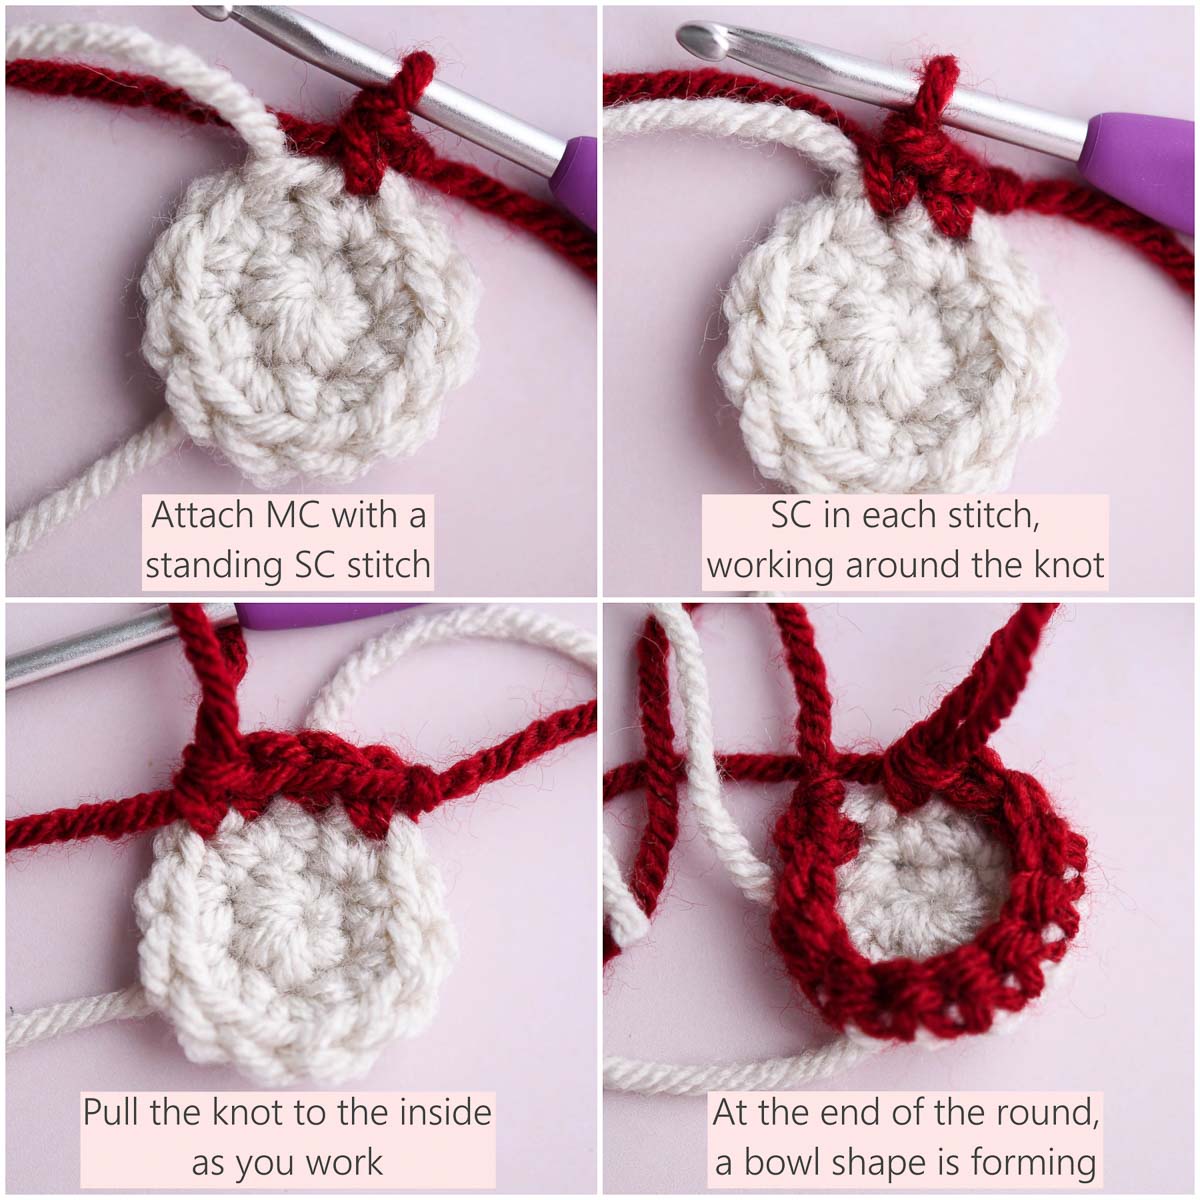
Tip: As you’re working, you’ll notice a bowl shape forming. You’ll need to flip your work with the right side out. This is a good time to weave in the ends to the magic ring and secure it.
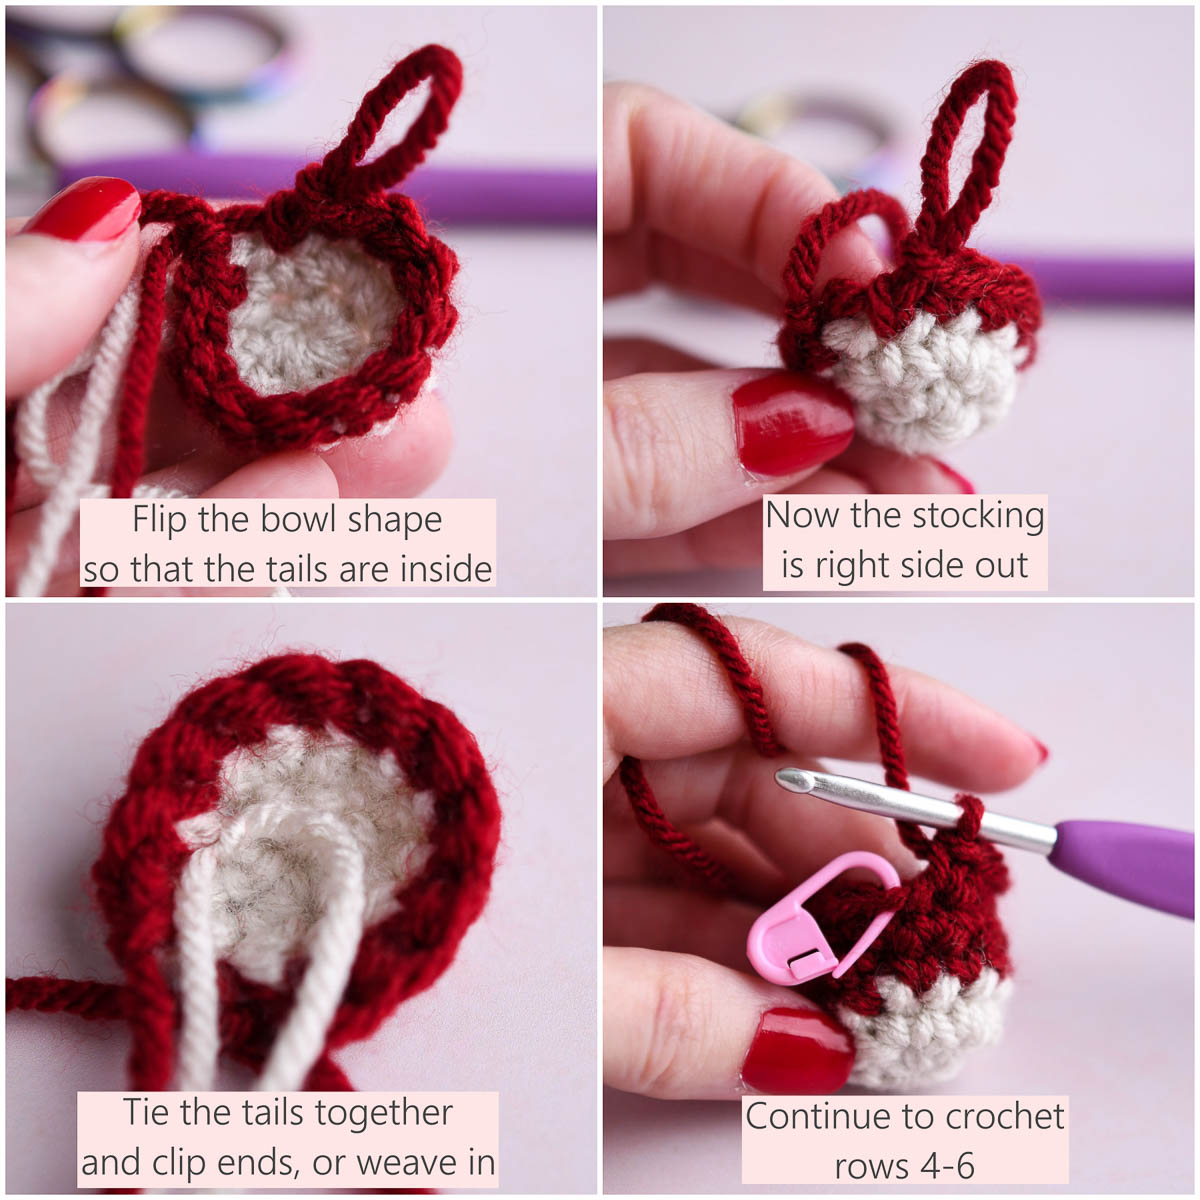
Round 4-6: Working in a spiral, SC in every stitch around. Mark the beginning of each round with a stitch marker.
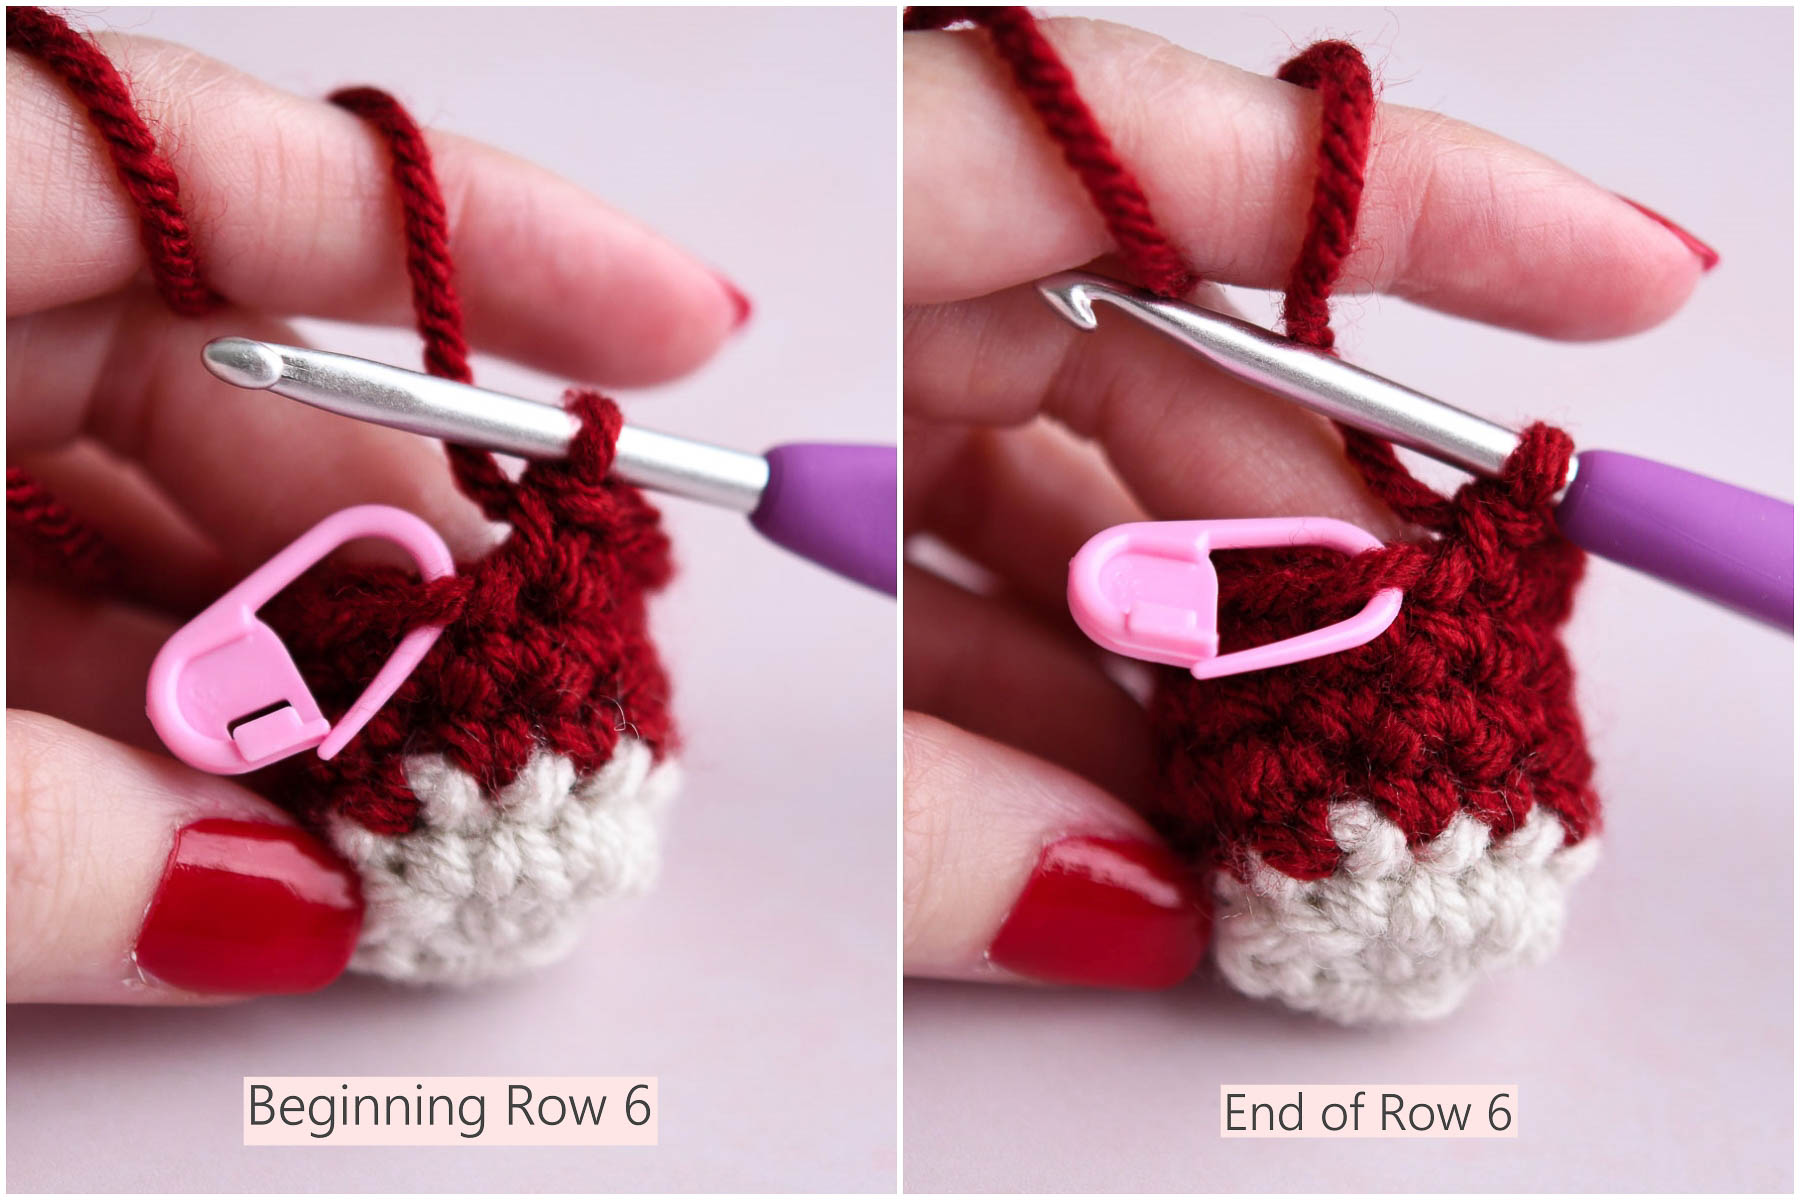
Heel:
Now we’re going to move the beginning of round (BoR) and set up for the heel. This moves any seams/yarn attach to the back/bottom of the stocking to be less noticeable.
Row 7: Set up stitches: SC in next 4 stitches. Pull the working yarn up into a long loop. Place a stitch marker in the next stitch. Don’t cut the yarn or fasten off. We’ll come back to this section after creating the heel.
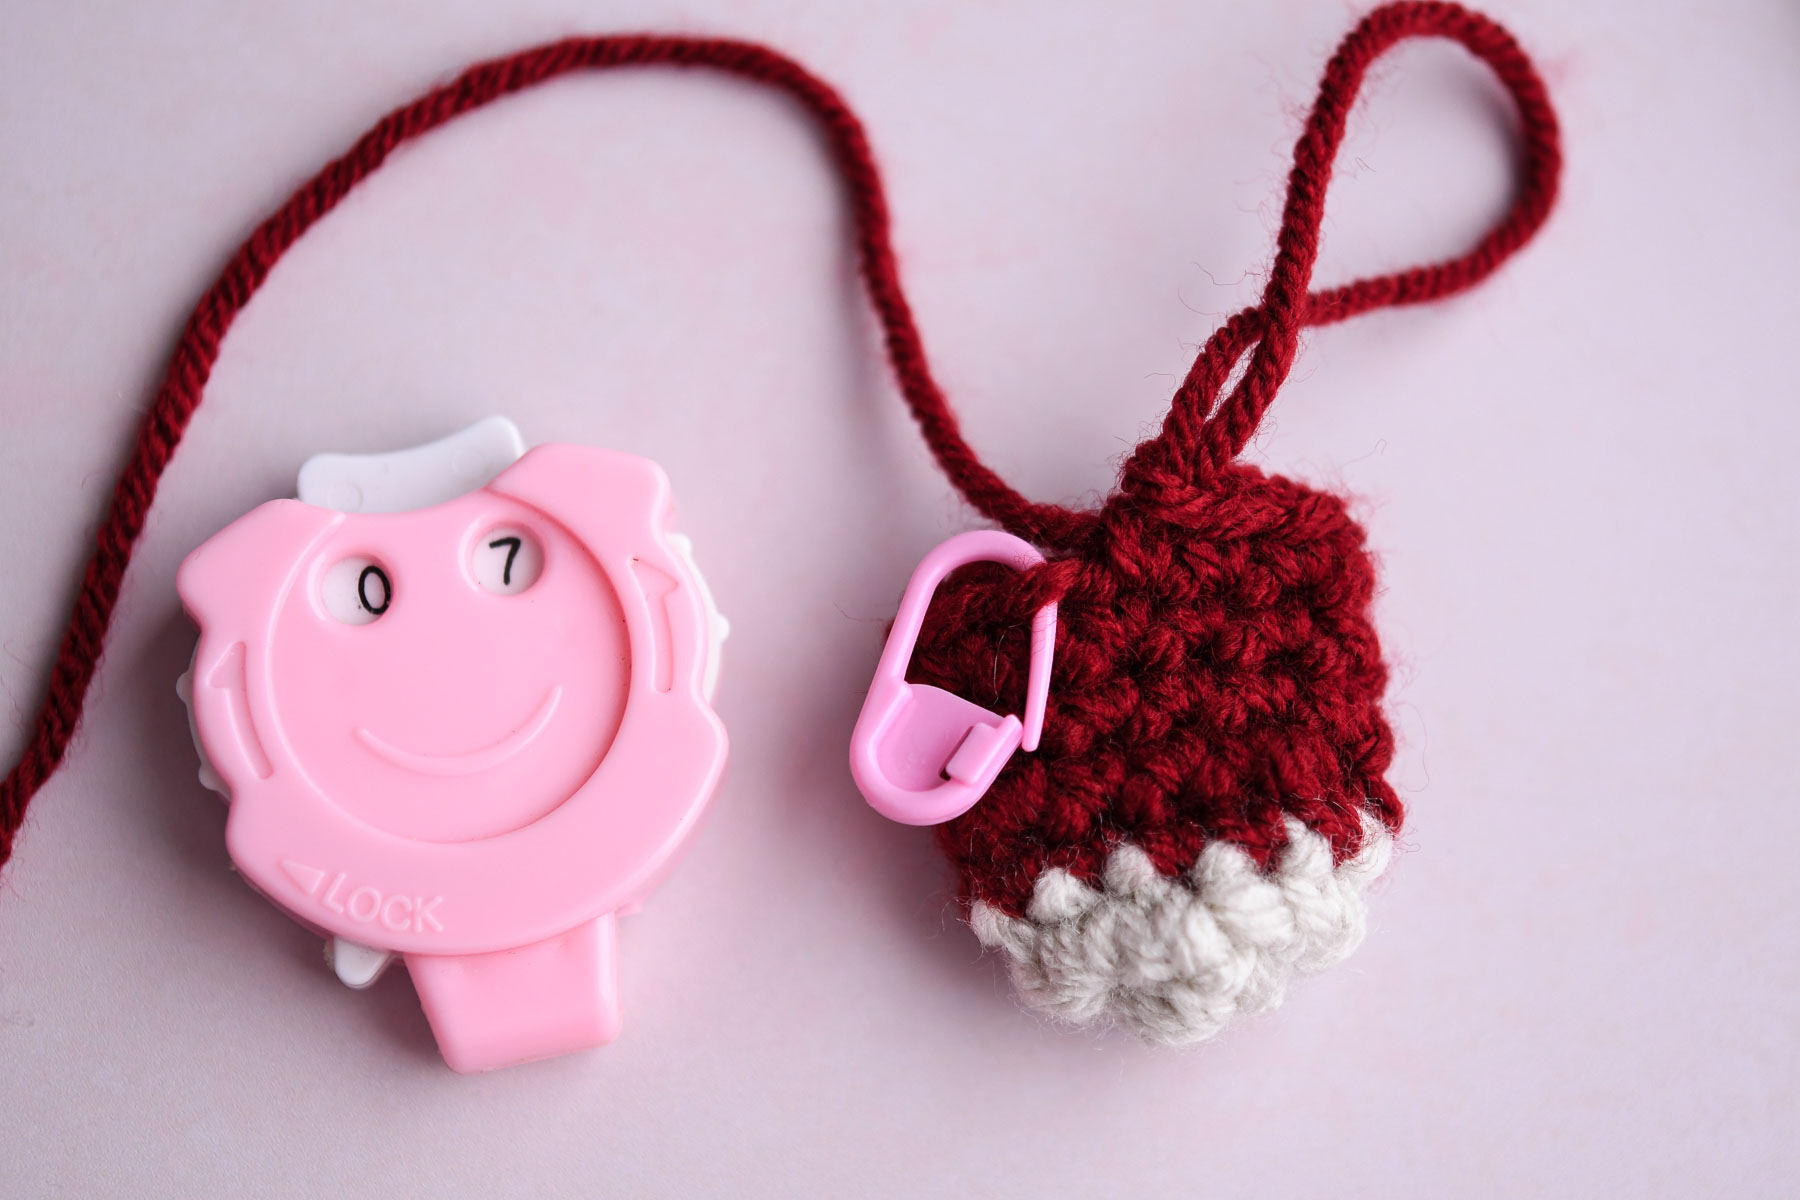
*Switch to heel color*
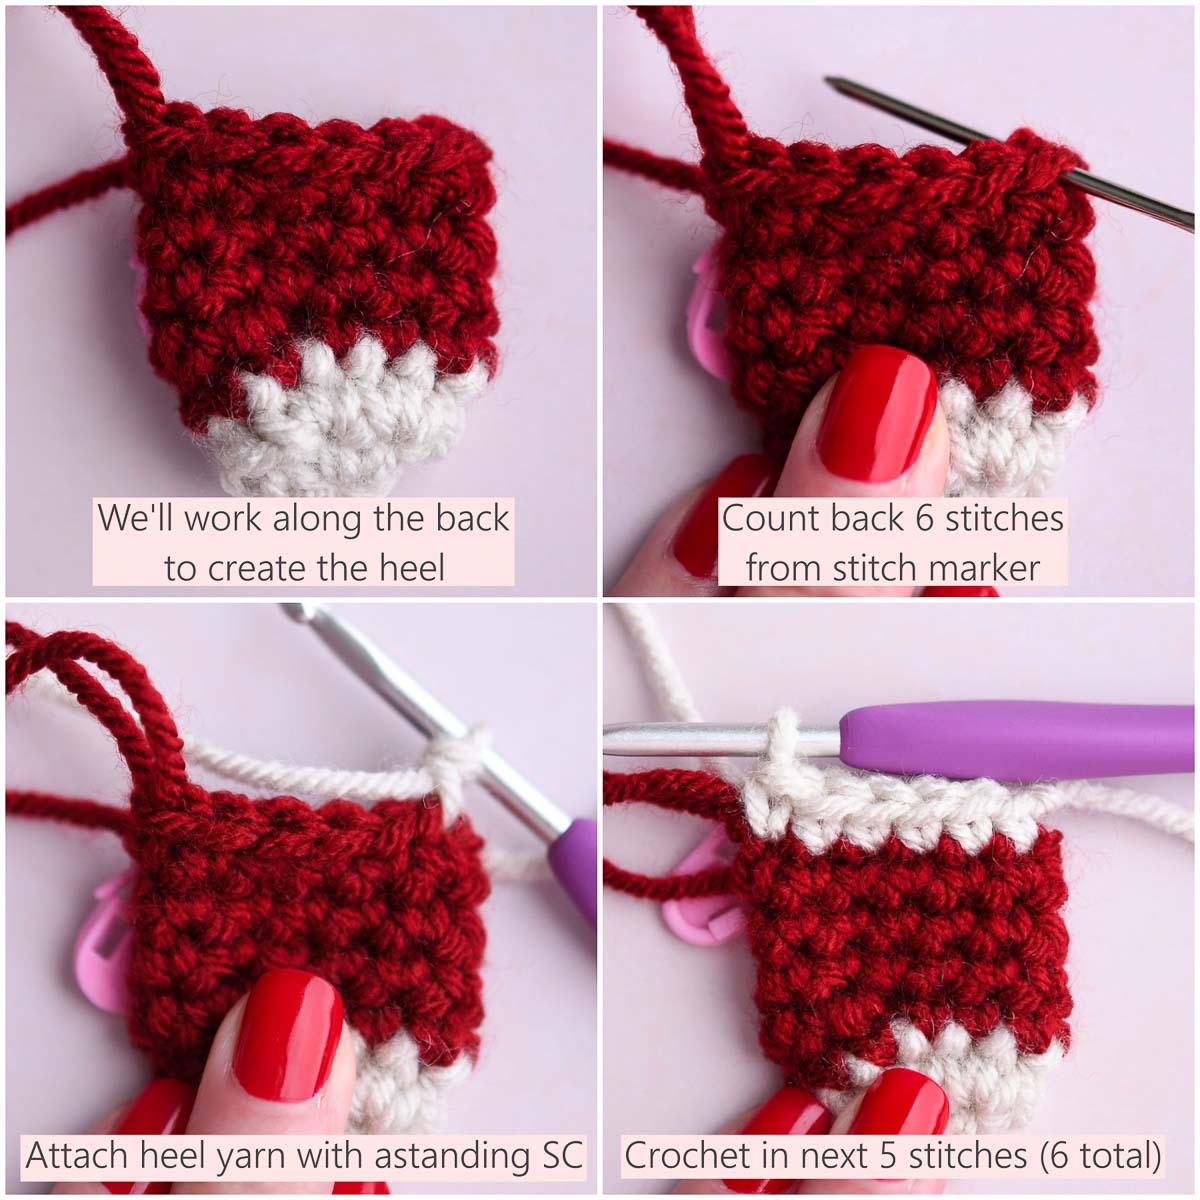
Heel Row 1: Starting with the last SC we created, count back 6 stitches and attach heel yarn with a standing SC. SC in next 5 stitches (6 total), Ch 1, turn.
Row 2: SC across heel, Ch 1, turn. (6 stitches)
Row 3: SC in 2 stitches, Inv dec, SC in 2 stitches. (5 stitches), then fasten off leaving a tail long enough to whip stitch sides together, then pull tail through to the inside of the work. Weave in ends if desired or push them inside stocking. I like to tie the ends in a knot and snip the yarn tails.
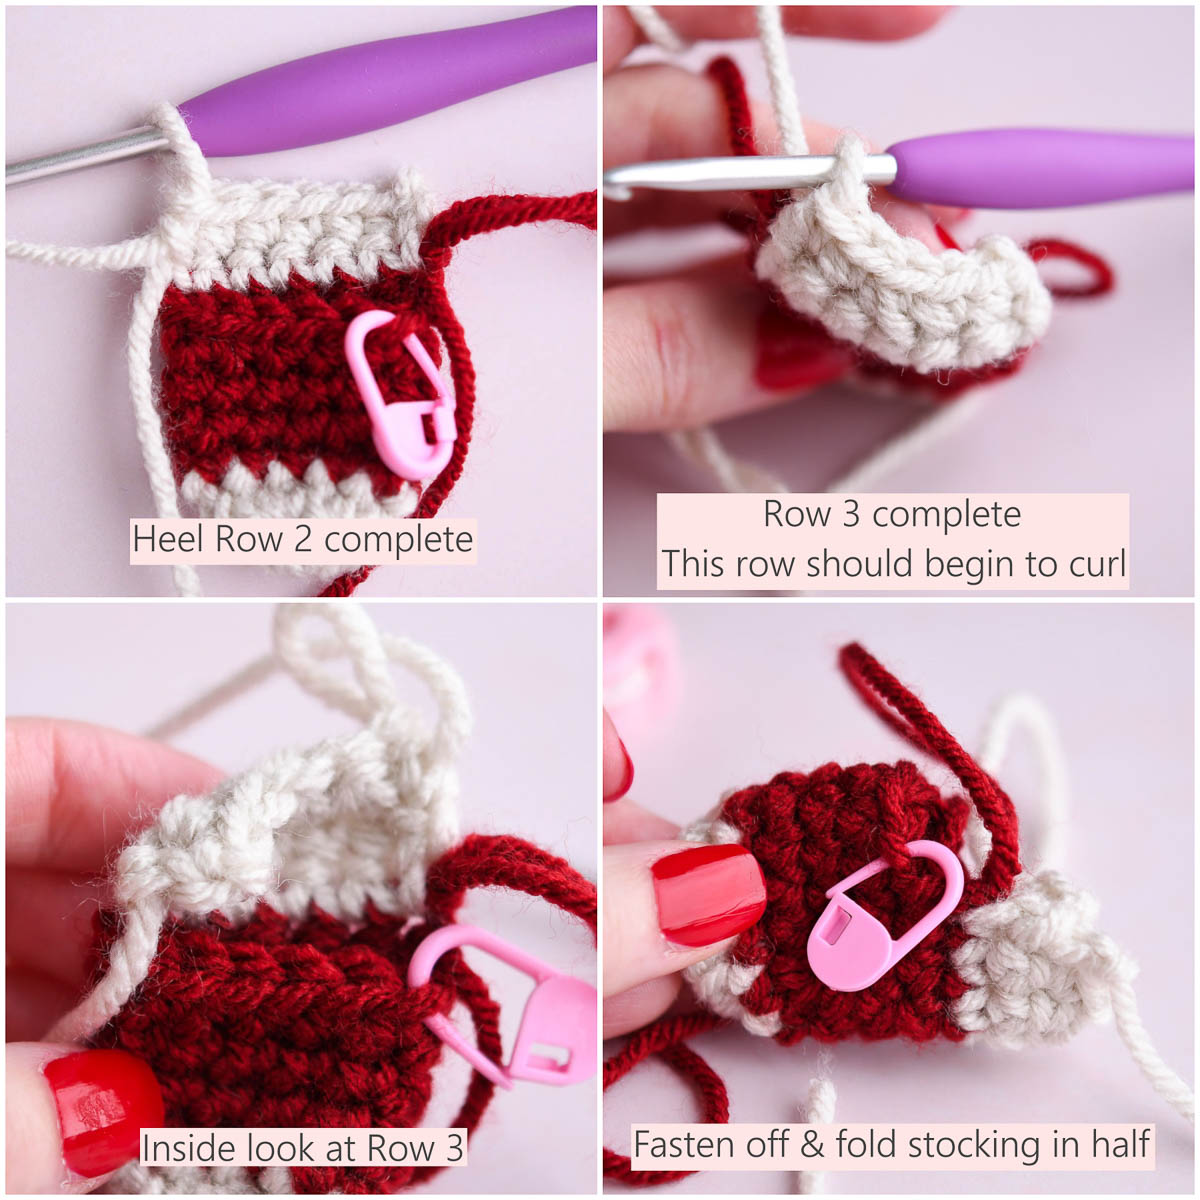
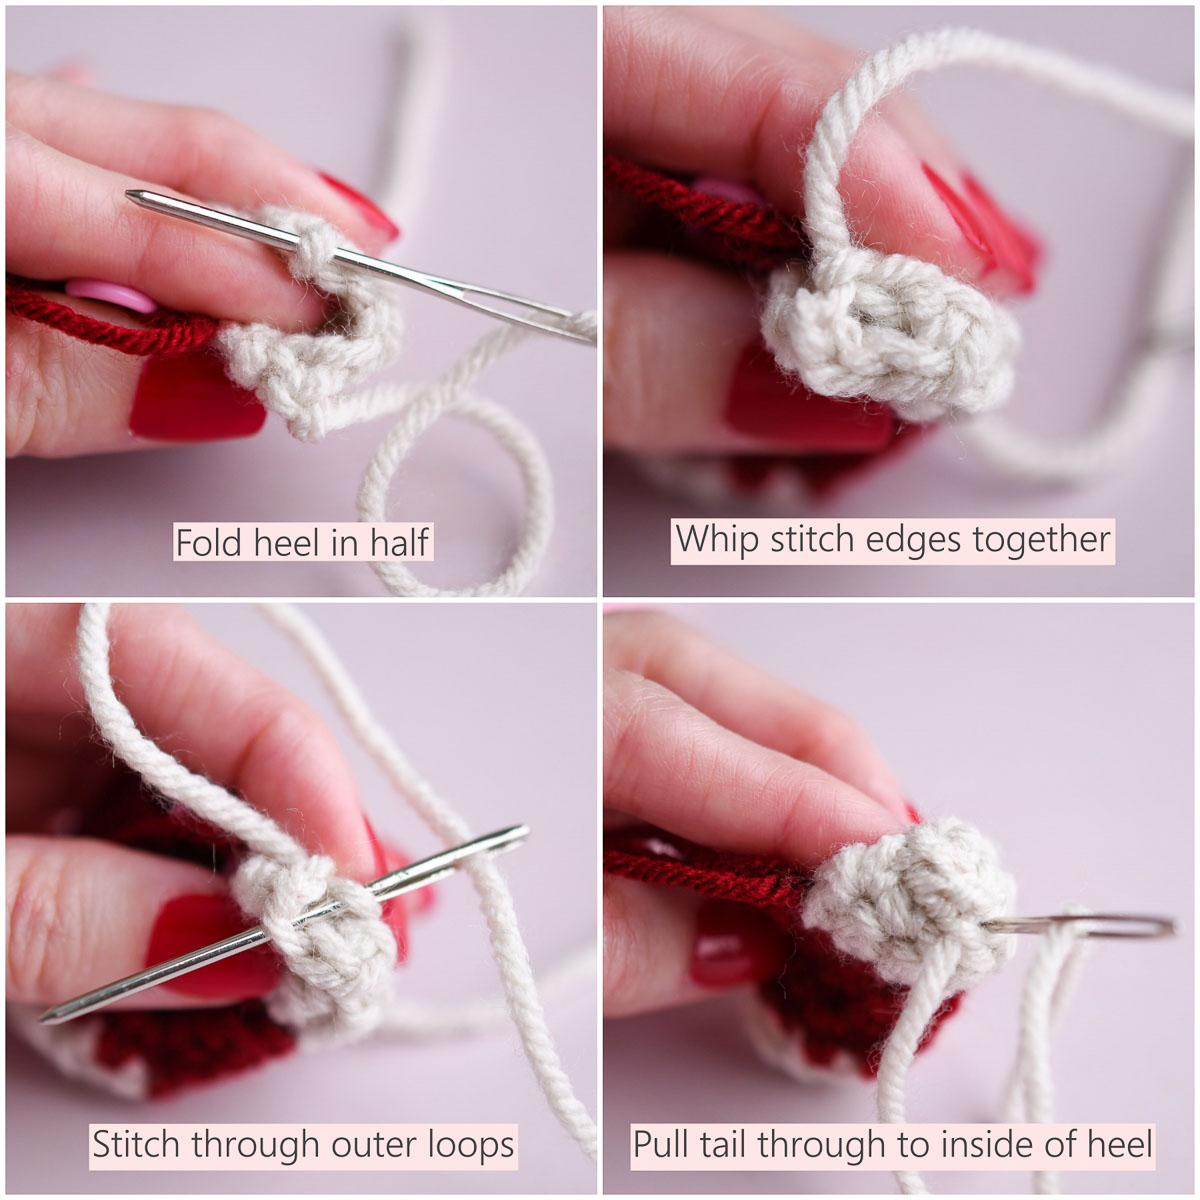
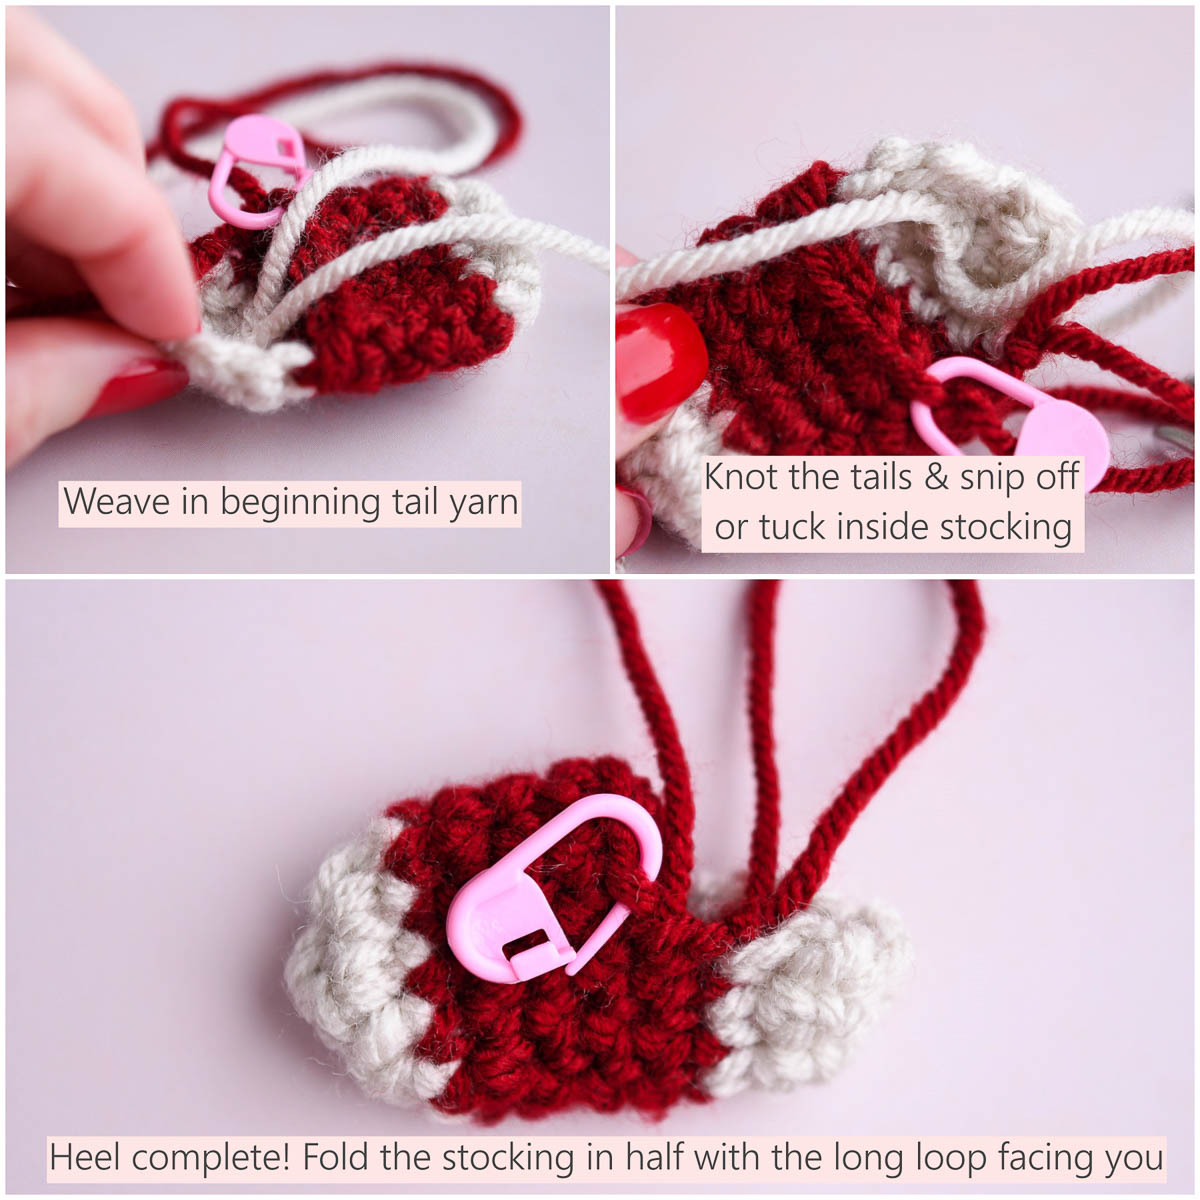
Leg:
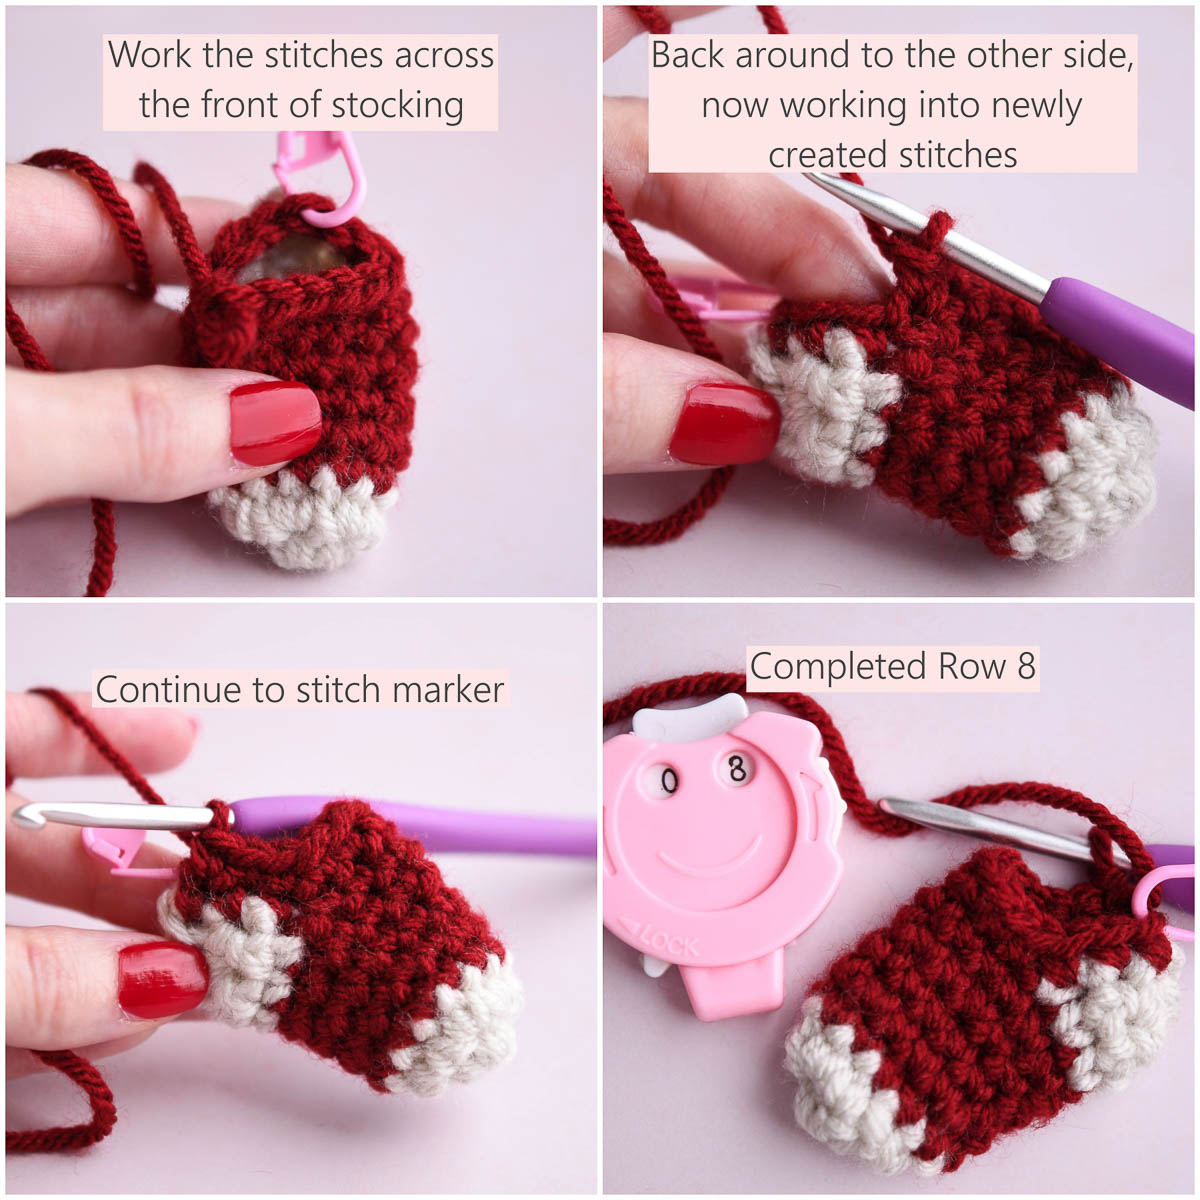
Round 7: Picking up with the main color yarn and the long stitch you left before, SC 6 across the front of the work, then place 3 SC evenly across heel the side of the heel.
Round 8: (First stitch created will be the new beginning of round: Place stitch marker, should be in the back of the stocking). Create 3 SC evenly across side of the heel, then SC 6 across the front, then 3 on side of heel. Back to the beginning of round.
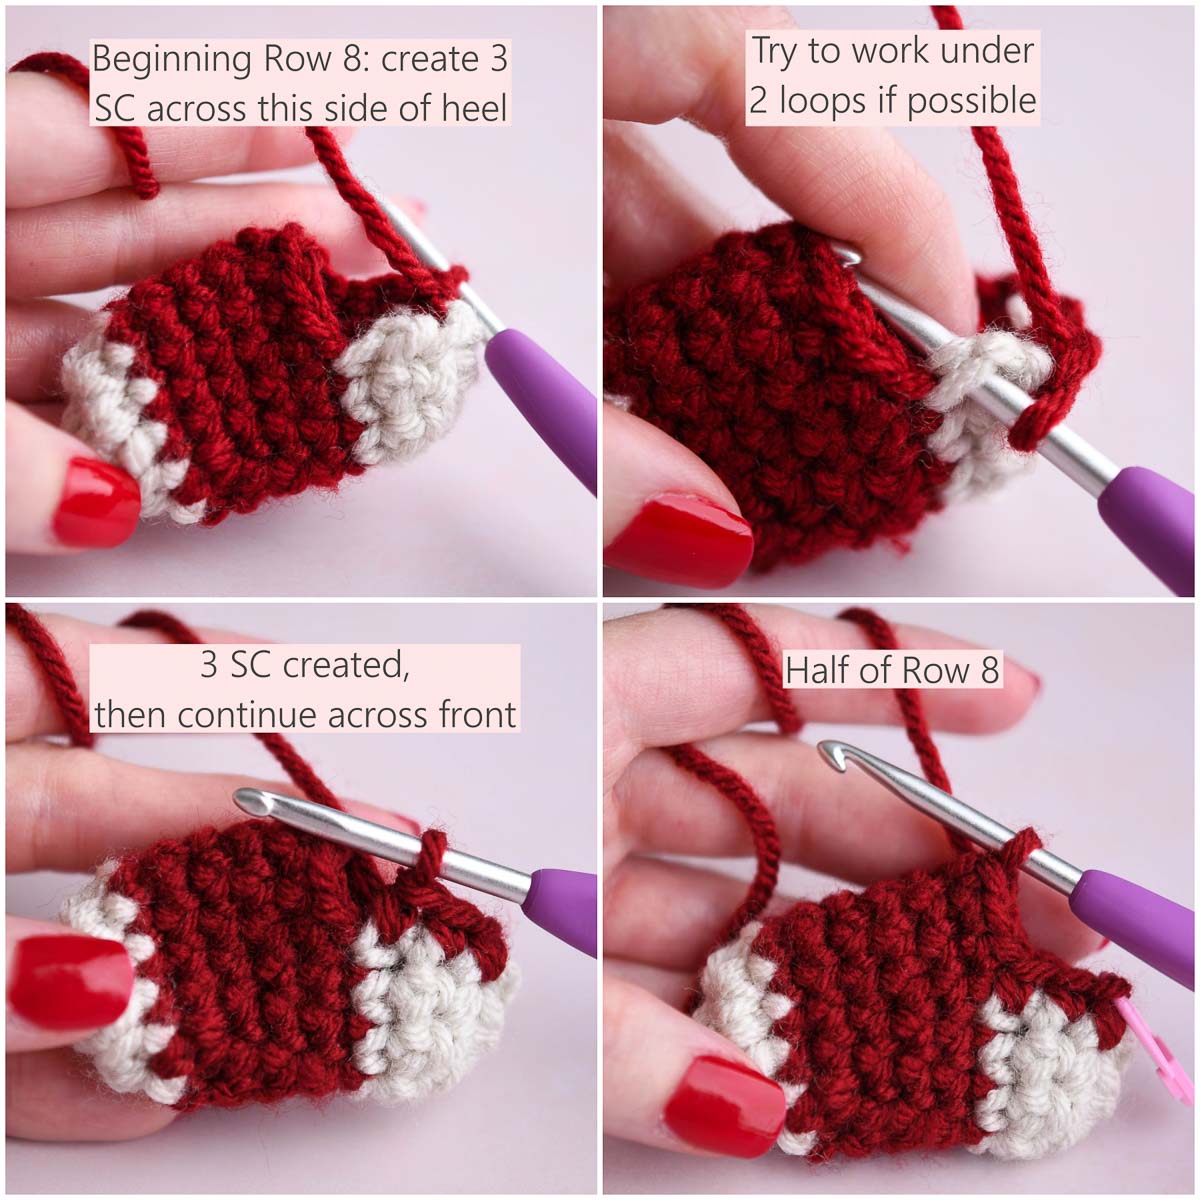
Round 9, 10, 11: SC in every stitch around.
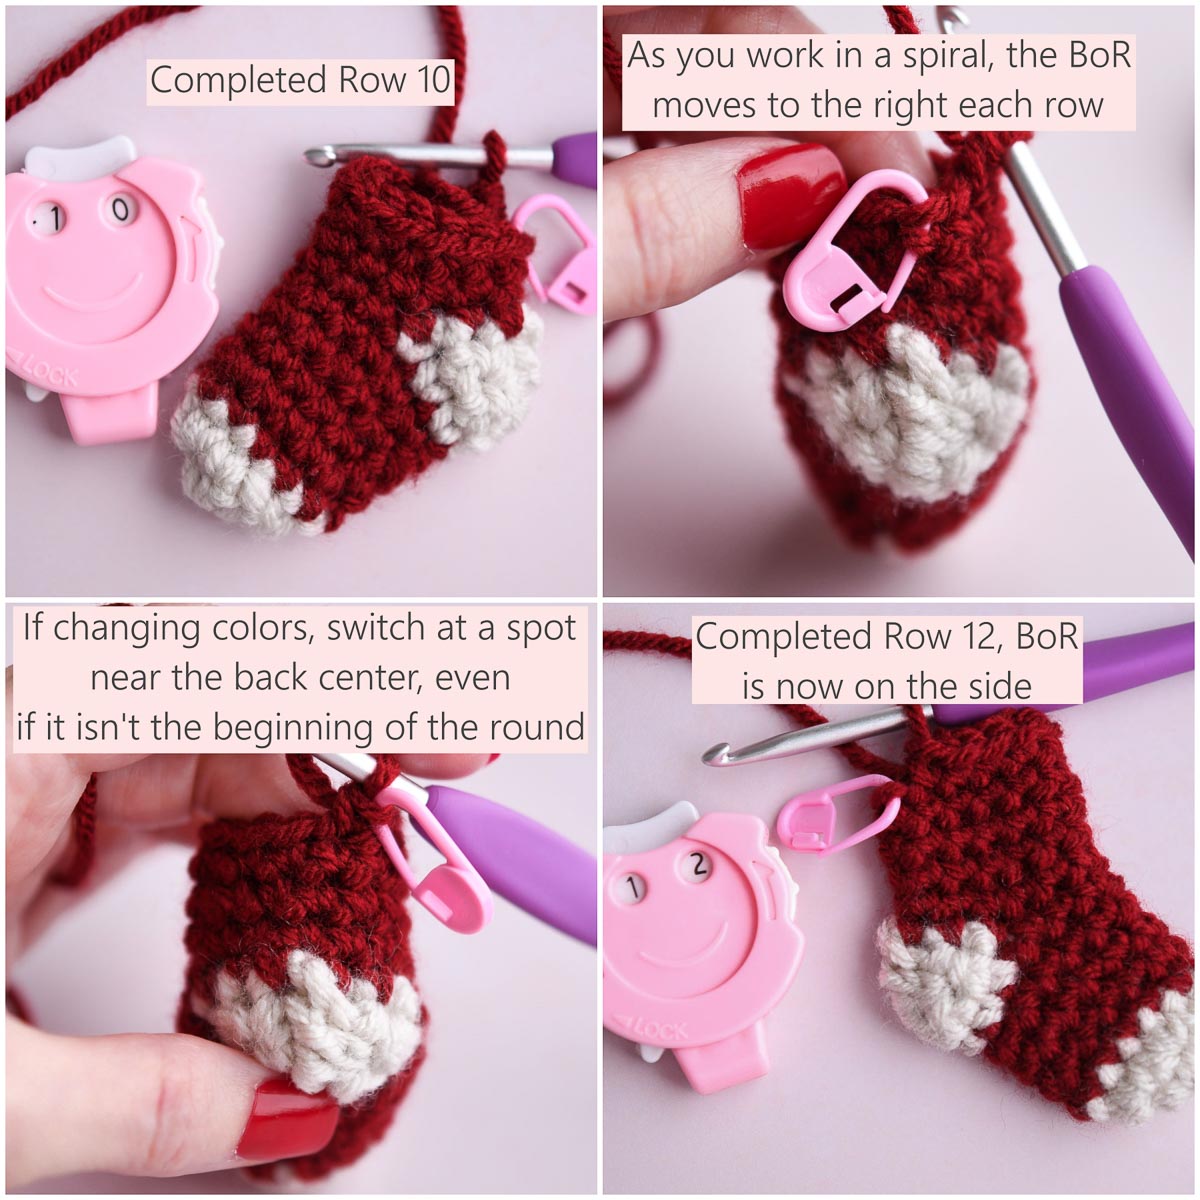
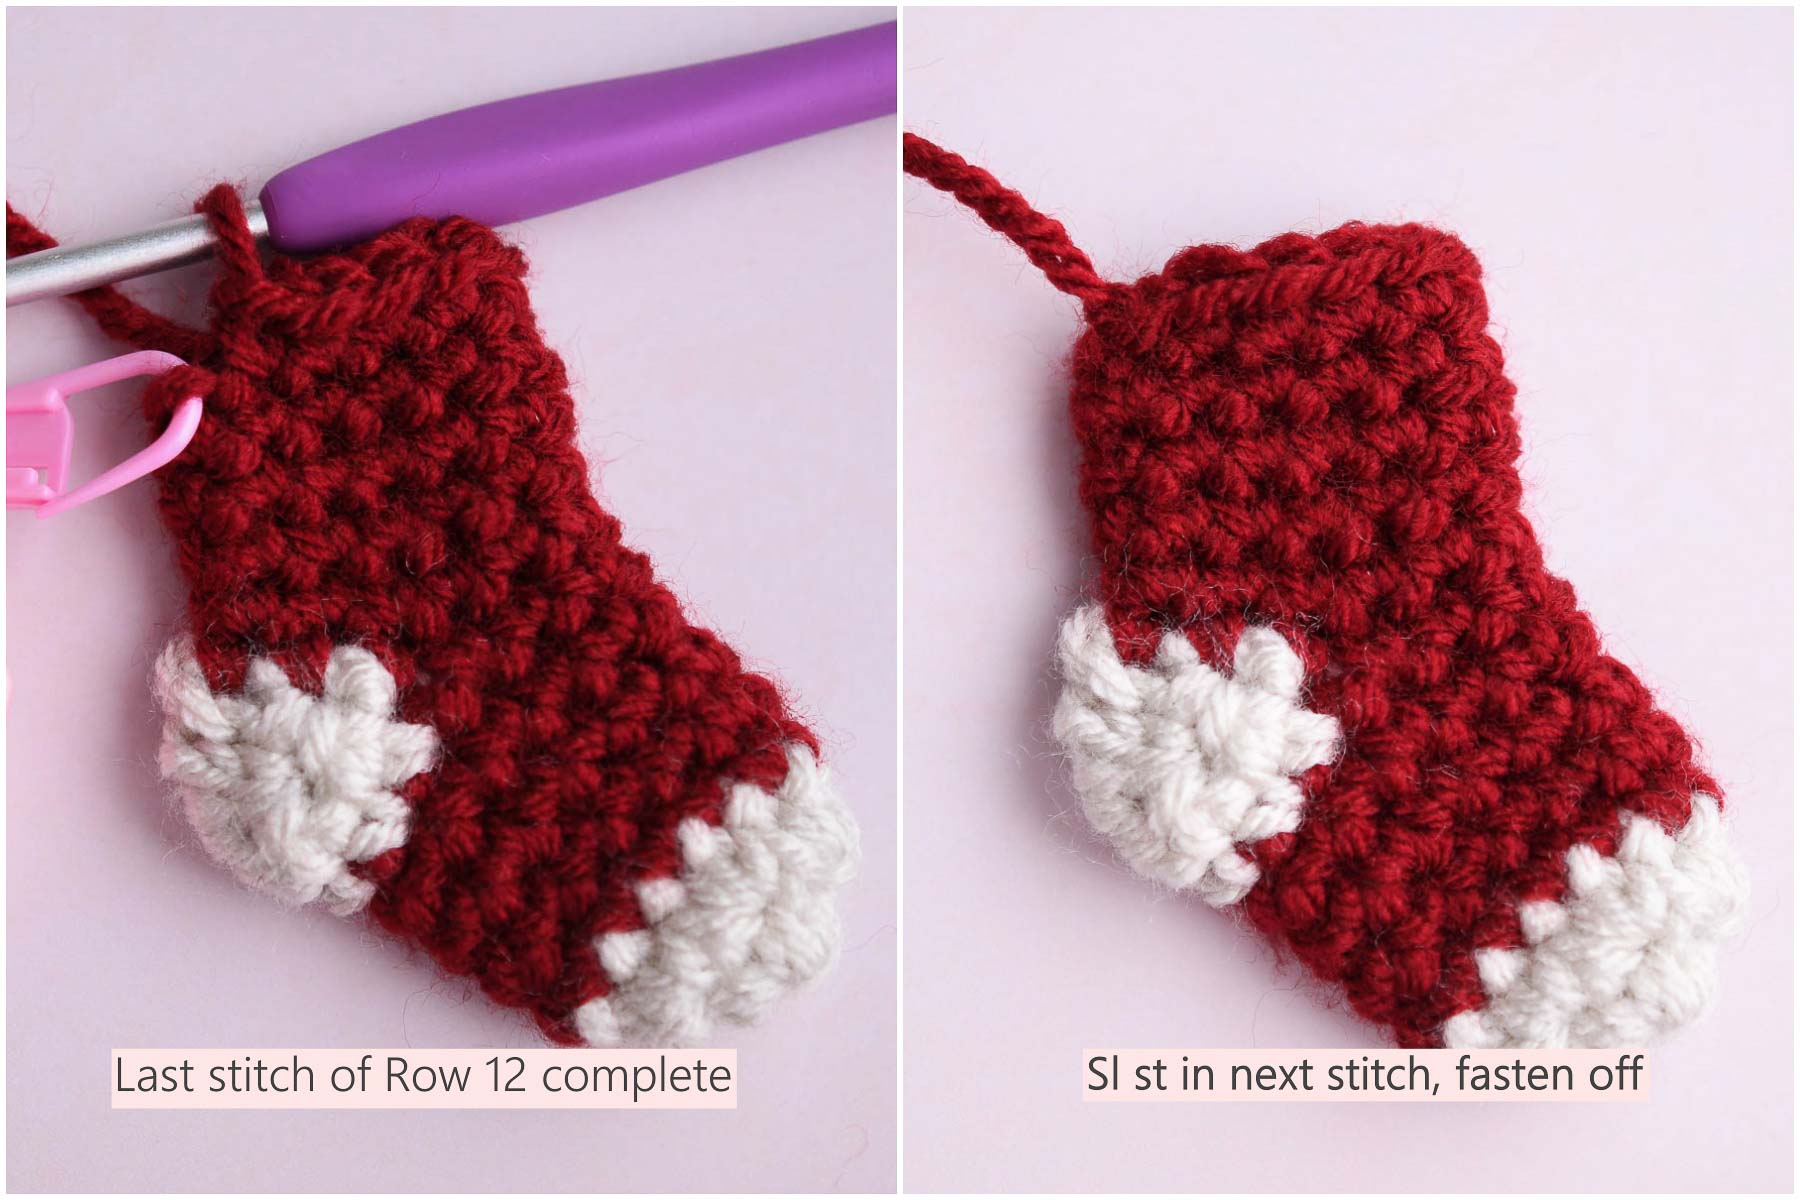
Round 12: SC around, then Sl st in next stitch and fasten off.
Cuff/Border:
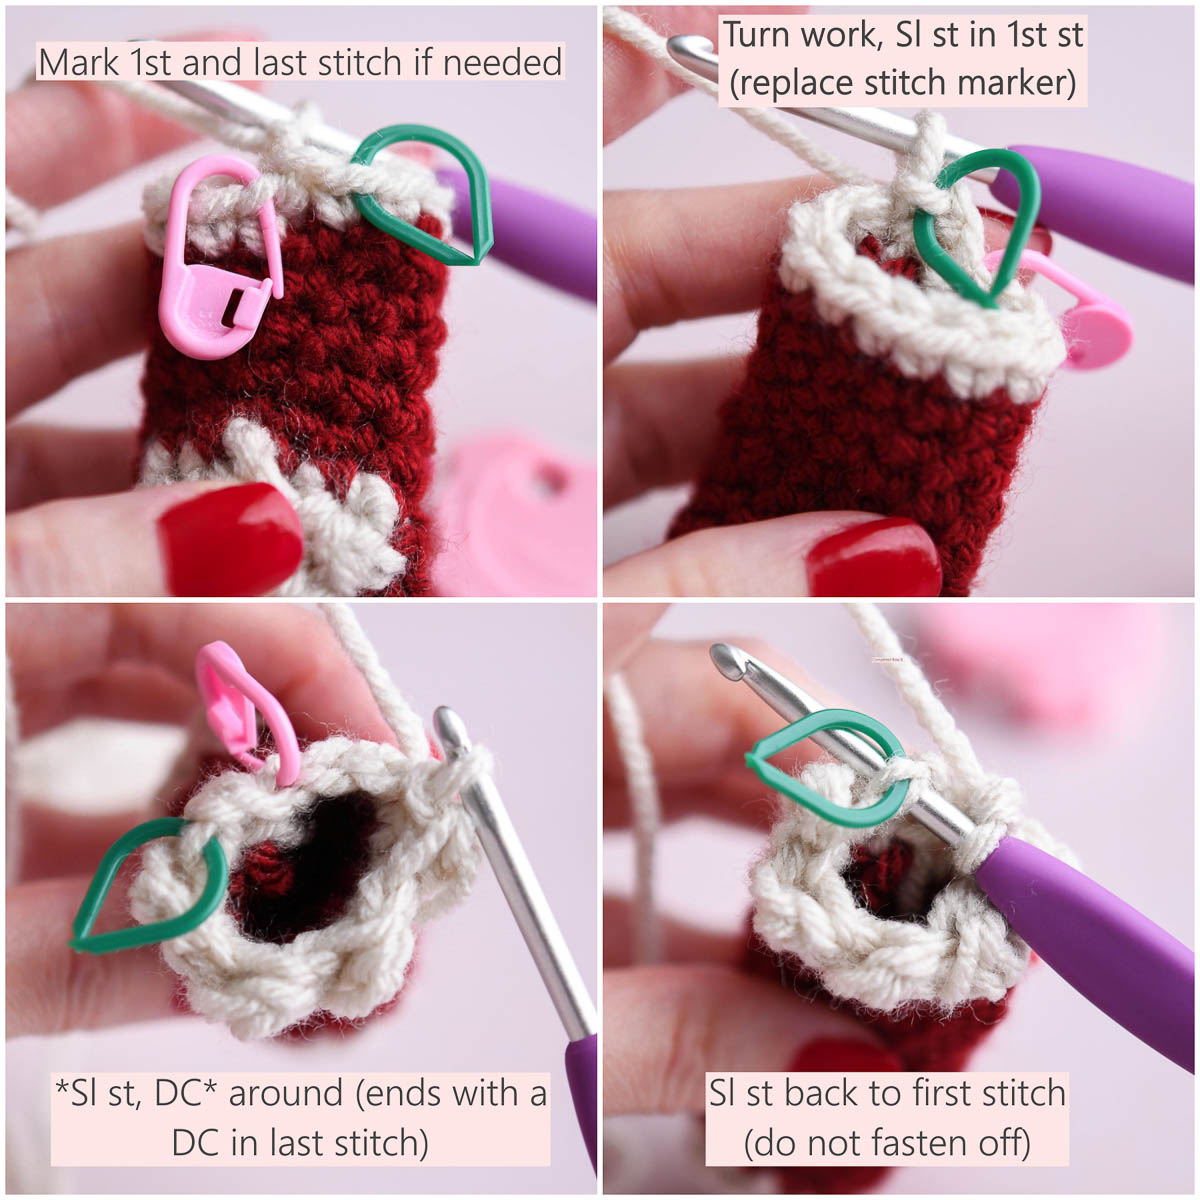
Round 13: Attach yarn with Standing SC in 1st stitch to the left of the center (back) of the stocking. SC evenly around, then Sl st to the top of the first stitch. Ch 1, turn work.
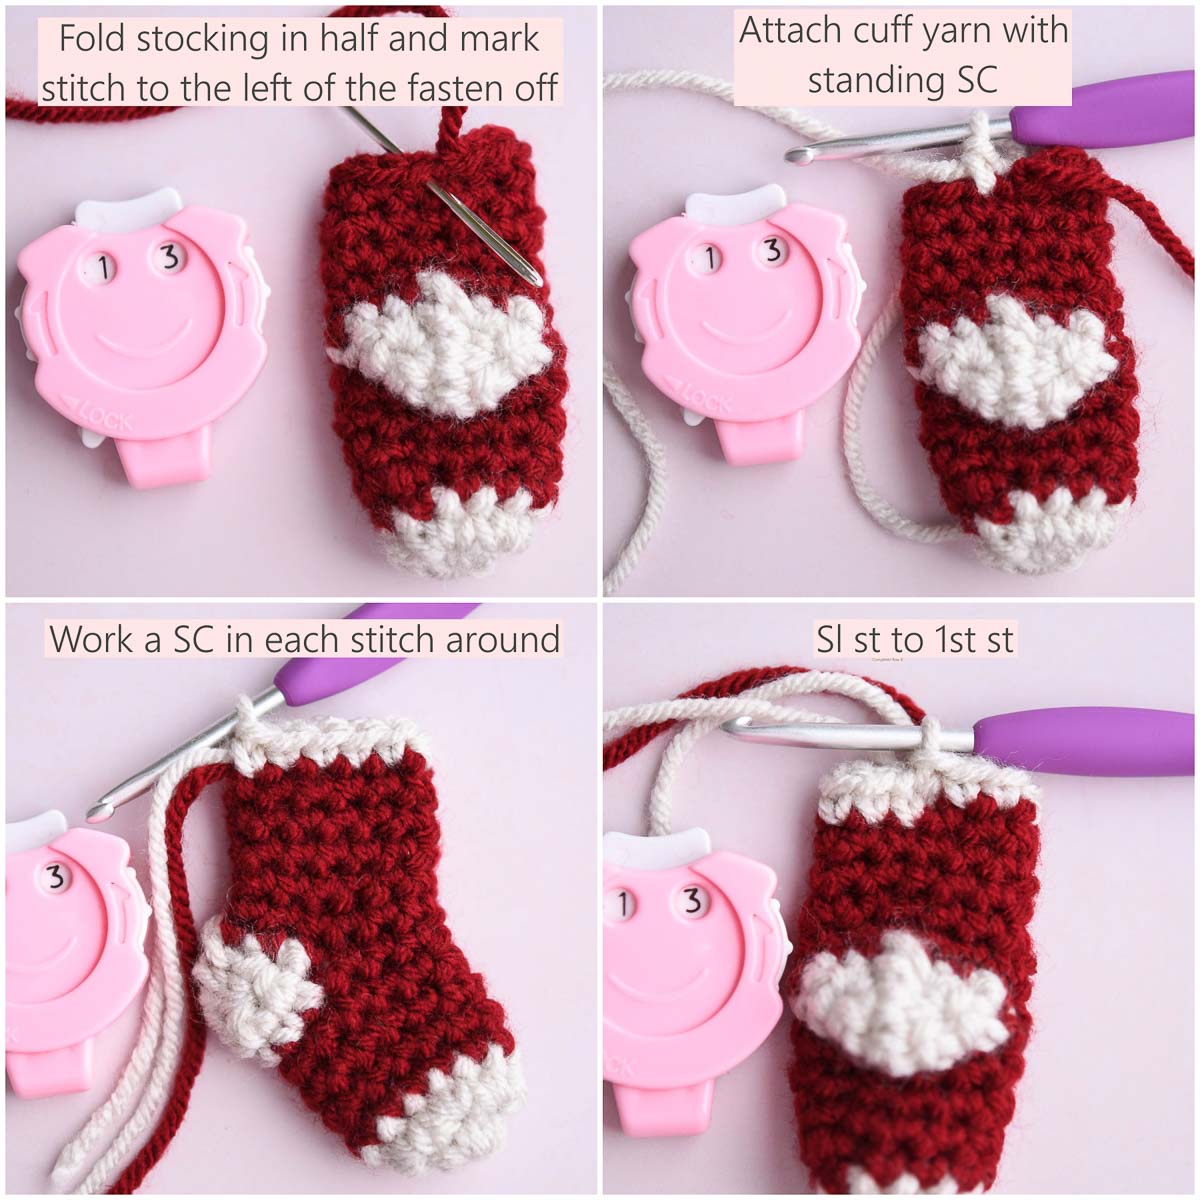
*For R14, You may need to use a stitch marker to mark the first and last stitch of the round.* For this round, you’ll be working in the opposite direction as before (no longer in a spiral).
Round 14: Sl st in first stitch, DC in next around, ending with a DC in last stitch. Sl st to the first Sl st of the round. Ch 12, then Sl st back to the first stitch. Fasten off. Weave in ends.
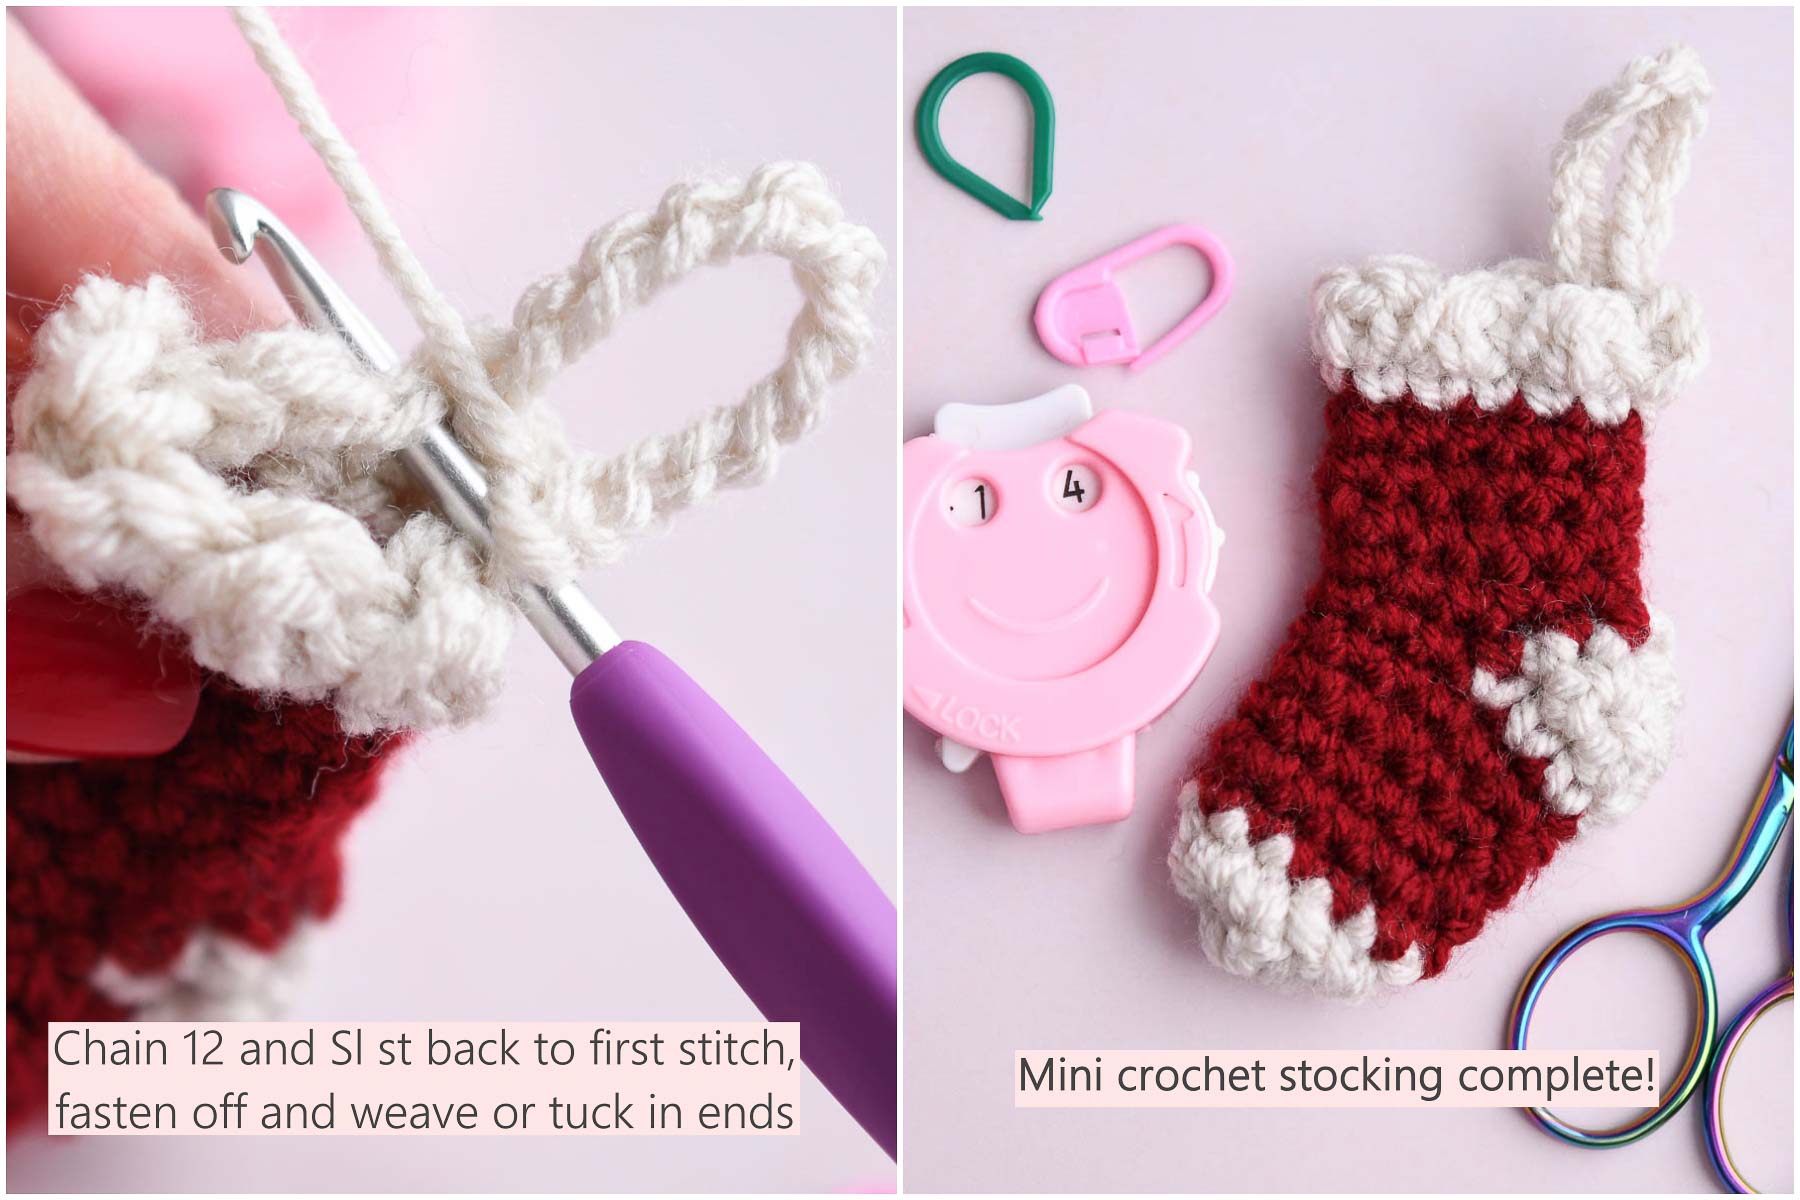
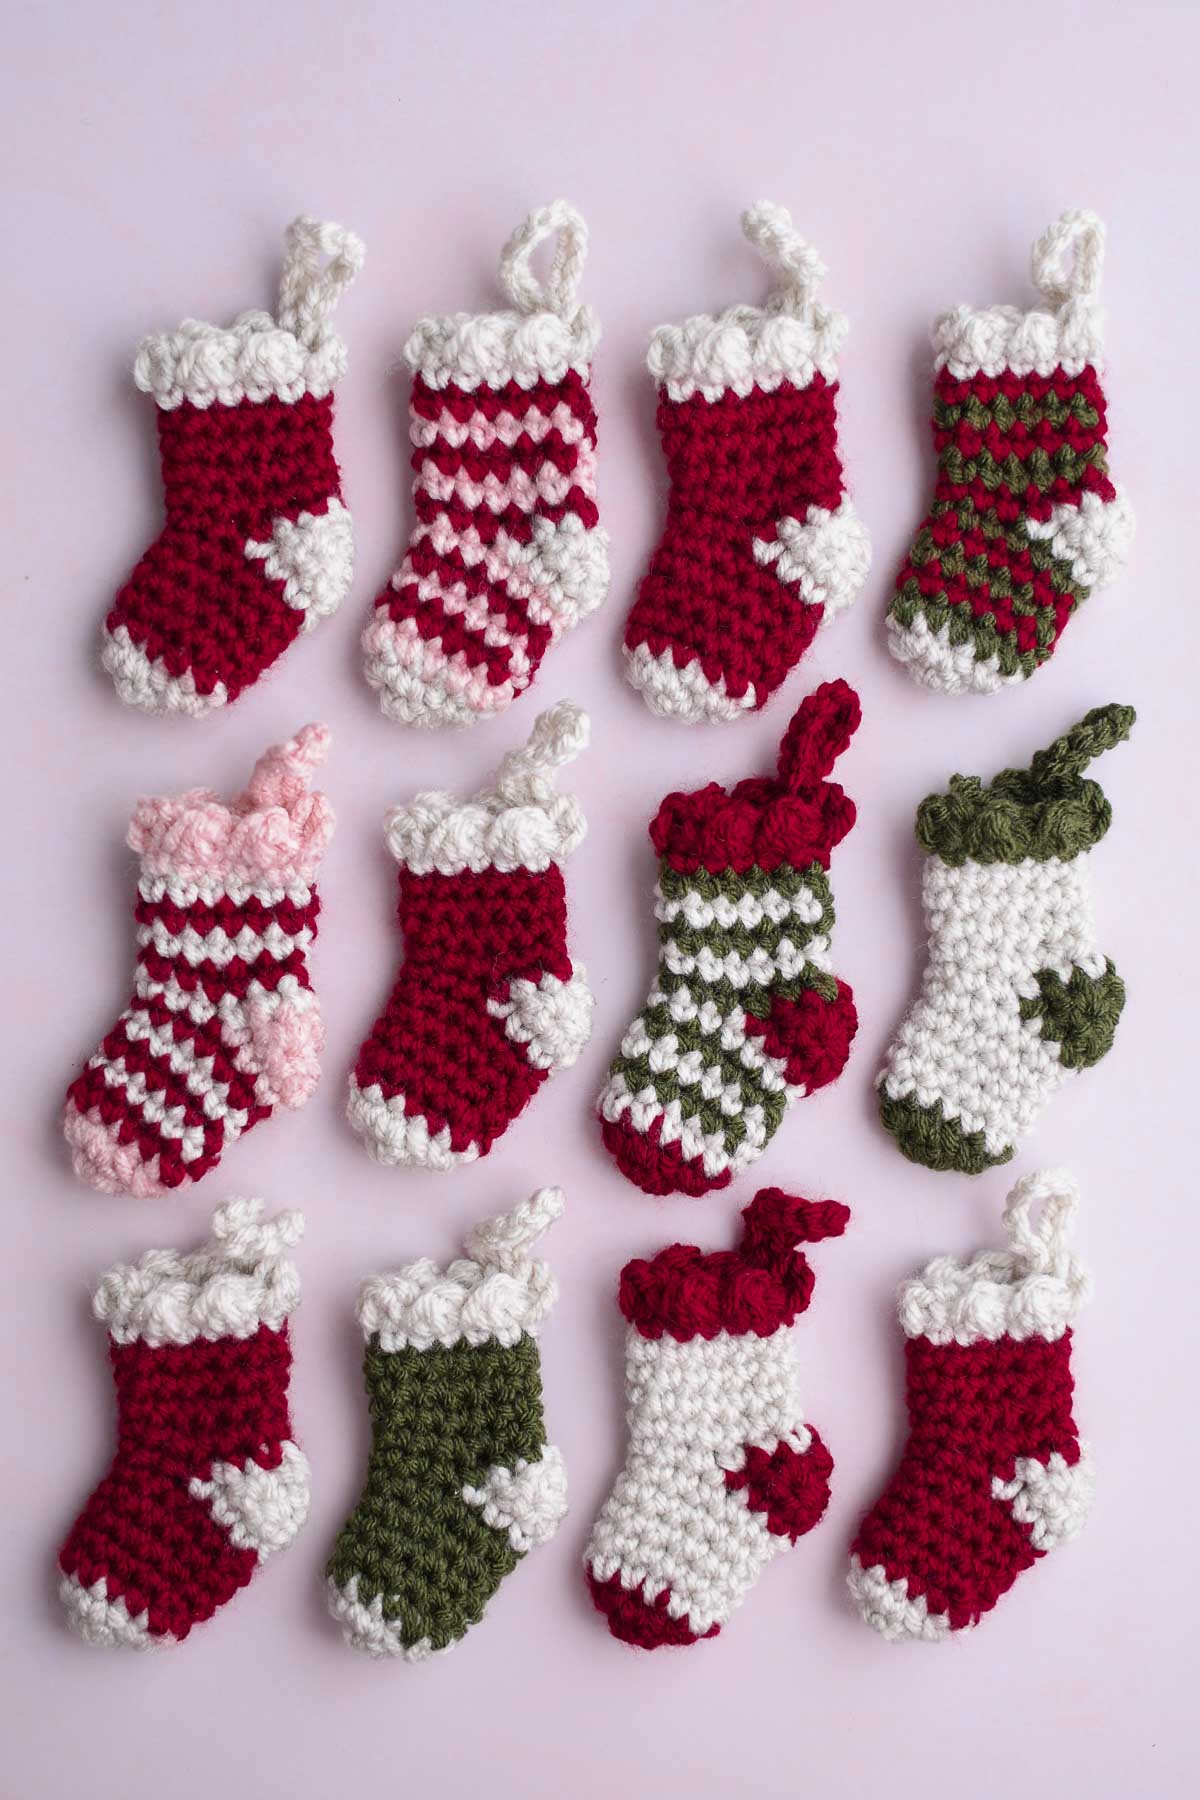
Congrats! You’ve made an adorable little stocking ornament! Now go make 15 more and decorate everything! These are so cute with a mini candy cane tucked inside.
I’d love to hear from you!
If you try this pattern and love it, please leave a comment and let me know how it went. Happy Crocheting!